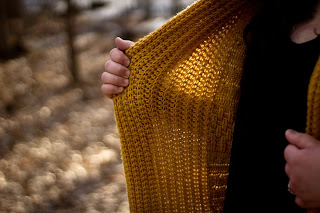
Making the Exeter Gansey Cardigan*, which is part of Annie's Signature Design series for the Fall/Winter 2019 season, was obvious to me the minute I saw it. I knew I had to make it. So, I got a copy of the pattern, did a few blog posts giving everyone the information they needed if they wanted to join in with me, and a group of us got together on Sundays and Wednesdays in November and December for LIVE videos on my Bizzy Crochet business page and made the sweater together. I think only a couple of people actually worked on it, but we had lots of good chats and visiting regardless. All of the videos are still on my Bizzy Crochet page under the videos tab. They take you all the way from start to finish just in case you need a little support.
As you can see, the pattern is filled to the brim with lots of gorgeous texture. And I'll be honest, even I was intimidated by how many different stitches were represented. I was worried that I would somehow screw it up and it wouldn't turn out like the picture. But, I shouldn't have worried. The stitches are very, very basic when they are broken down into sections, which this pattern does throughout. It is a three-section repeat with raised horizontal bars in between created by doing the crab stitch in the front loop only of the previous row. It takes a few rows of them to get really comfortable doing them. But, as with any stitch you repeat over and over, comfort does come with that stitch eventually. You will feel like you can do anything after you complete this sweater.
On the blocking boards. I blocked every piece of this pattern to the recommended measurements. I did make sure I was on the gauge before starting the pattern, so it wasn't difficult to block. I ended up a hook size smaller than the pattern called for- so make sure you do a gauge swatch! I have a blog post here that will help with that for this pattern.
The next picture shows the front and back pieces sewn together at the shoulders and sides after blocking. The blocking helps the stitches to stand out better and makes my edges nice and straight for assembly. (I wet-blocked all my pieces.)
After the sleeves were set in, but before I started crocheting the collar. The flow and fit of the sweater were already perfect. My daughter was home for a quick weekend visit and I had her try it on like this and it fit her perfectly. All I had left to do was put on the collar.
The collar was completely different construction from the sweater and was worked on the front band as a whole, not as a separate piece that was sewn on later. This made it a bit of a heavy challenge toward the end. I figured out that I had over 5,000 stitches in the collar alone by the time I was done. This sweater is no joke! It's as heavy as a blanket, but that makes it perfect for that cold Northern weather my daughter lives in Michigan.
The next pictures are of the sweater on my mannequin. I had to get some pictures of the completed project in my garden before sending it North. In total, this sweater took me just over two months to crochet. But, this was also being worked on over the Christmas and New Year holiday break, so there were several weeks it never got touched. I would say that if I were to just sit down and work on this, it would take me 3 to 4 weeks, including the blocking time. It is definitely a labor of love.
In my head, I kept telling myself I would never make this sweater again. But, now that I've had a week or two away from it...I would. I would make this sweater again. It's not difficult to make. The repetition of the pattern just hums along after a bit. The instructions for sizing are perfectly clear. If you do a gauge swatch before starting, (be more concerned about the width than the height because you will control that with the repeats) then you will have plenty of yarn if you buy the yardage for your size. (I made an XL and had half a skein leftover of the yarn I purchased.) I think what took me so long was "second side syndrome" sort of like "second sock syndrome". I had fun doing the first one (side), but now I have to do it again! haha.
Nevertheless, I did complete the sweater and with just enough time for my daughter, Stefani, to use it this winter in Michigan. The following pictures are of her. Her friend Jade of @_jade_photography_ on IG took these lovely pictures. They are so artsy and pretty! Thank you for being my model, Stefani, and thank you for the lovely pictures, Jade!
If you read all the way through...thank you for hanging out with me! I hope you feel inspired to make your own Exeter Gansey Cardigan*, and if you do, I hope you let me know and share your progress with me!! I would love to see your work and help you with any questions if you have them. I'm always here to cheer you on!
*Links marked with asterisks are affiliate links. If you use one of my links to make a purchase it won't cost you any more, but the company may give me a small bit of money back which helps me pay for the free content on my blog. Thank you for your support!


.png)


Wow, gorgeous ....looks awesome..:)
ReplyDelete