Hey there, my crochet friends!
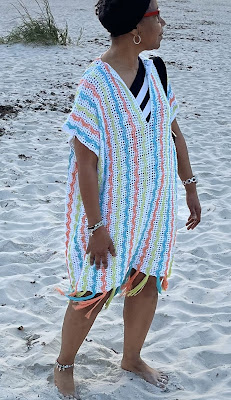
I am thrilled to announce the Boho Chic Summer Cover-Up, which was a CAL I cohosted with my wonderful friend Pamela Kuloba from Pam's Cozy Corner! We both live in Pensacola, FL and thought that working together to make a fun Summer CAL would be just the thing to celebrate the Florida beach life. This is a chance to explore two fabulous designs using the same yarn, making it a unique and exciting project for all skill levels.
🌸 **Two Designs, One Yarn!** 🌸
Pam and I have each created a special cover-up using the same yarn, Lion Brand Truboo. Truboo is a 100% Rayon (from bamboo) DK weight yarn. This yarn can be easily substituted with any other DK weight cotton or cotton blend.
Our two suggestions are:
Both brands are a great replacement for the *Lion Brand Truboo.
Pam’s design is a stylish Robe Style, perfect for lounging in the sun or adding a boho touch to your summer outfits. My design is a chic Pullover Style, great for a casual day out or a beach cover-up. Both patterns are available for FREE on our blogs!
✨ **Inclusive Sizes** ✨
We believe everyone should feel fabulous in their handmade creations, so both designs come in three inclusive sizes: S/M, L/XL, and 2X/3X. There’s a perfect fit for everyone!
Click the picture below to go to Pam's Robe pattern.
🎉 **Join the Fun!** 🎉
If you make one, head over to the Bizzy Crochet's CAL Group on Facebook. It’s a vibrant community where you can share your progress, get tips, and connect with fellow crocheters. We’re all in this together, and it’s going to be a blast!
📜 **Upgrade to the PDF!** 📜
While the patterns are free on our blogs, we’re offering an upgraded PDF version available for purchase. Each of the PDF's will be available through our respective blogs.
My PDF includes both US and UK crochet terms for download, making it easy for everyone to follow along. Plus, it's beautifully formatted and perfect for printing!
📹 **Helper Videos** 📹
I know that sometimes a little visual aid can make all the difference, so I’ve got you covered with helper videos for the pattern and assembly of the Pullover Style. These videos will guide you step-by-step, ensuring you have all the support you need to create your stunning cover-up.
Click HERE to go to the Cover-Up Tutorial Playlist!
So, what are you waiting for? Grab your hooks, join the Facebook group, and let’s get crocheting! We can’t wait to see your beautiful Boho Chic Summer Cover-Ups!
Boho Chic Summer Cover-Up Pullover Pattern:
by Elizabeth Mareno
Yarn:
DK Weight yarn- 100% natural fibers
recommended, but anything you’re comfortable with will work.
Notions:
·
US F/3.75mm
crochet hook
·
Yarn needle
·
6” wide cardboard
or book for wrapping tassels
Skill:
Beginner/Advanced Beginner
Finished Size
(not blocked/without fringe):
S/M – 31.5” L x 25” W
L/XL – 33” L x 27-1/2” W
2X/3X- 34.5” L x 31-1/4” W
Gauge:
DK- F/3.75mm hook- 14 dc x 12 rows =
4” x 4” (10cm x 10cm).
Notes for personalization:
1.
LENGTH: Each full chevron (in gauge) is 1-1/2” and 10 stitches + 1.
If you want to make your cover longer, add an additional 10 chains per 1-1/2”
increase to the original chain/length. Don’t forget you will have to do it to
all three panels to make sure they come out the same.
2.
WIDTH: Each 2-7 row repeat (in gauge) is 1-1/4” and will give you
a full finished chevron. If you want to make your cover wider, just add an
additional 2-7 row repeat per 1-1/4” increase to the original width. Don’t
forget you will have to do it to all three panels to make sure they come out
the same. The two front panels should equal the width of the back panel when
completed. Pay attention to the sizing in the pattern below.
Abbreviation List: US
Beg- Beginning
Dc- double crochet
RS- Right Side
Sl st- slip stitch
Sc- single crochet
WS- Wrong Side
Specialty
Stitches:
Standing Single Crochet (St Sc): How to do a Standing
Single Crochet
NOTES:
- · Any DK weight/#3 Light Yarn of comparable size will work for this pattern.
- ·
Ch4 at the
beginning of a row equals (dc + ch1).
- · When starting a
colored row, leave a 6” end before your knot. When you do your fringe you will
be able to capture it in with the rest of the pieces and hide those ends.
- ·
Sizes are written
in S/M with the larger sizes in parentheses, (L/XL, 2X/3X)
- · The panels are worked in rows, pay particular attention if the RS or WS is facing when starting a new row.
- · The Cover is made in panels (2 front panels and one back panel) which are then seamed across the shoulders, and up the front and sides, leaving neckline and armhole openings.
Pattern: S/M
(L/XL, 2X,3X)
With MC, Chain 214 (224, 234)
If you want to
customize your length, see the Notes for Personalization on the previous page.
Row 1: (RS) pm in the second ch from
the hook, dc in 6th ch from the hook (skipped chs cts as dc + ch-1
sp), (ch1, sk 1 ch, dc in the next ch) repeat across. 106 dc, 105 ch-1 sp (111
dc, 110 ch-1 sp: 116 dc, 115 ch-1 sp)
Row 2: (WS) ch4, sk ch-1 sp, (dc in the
next dc, ch1, sk ch-1 sp) repeat across to the last dc, dc in the last dc, put the
loop on stitch marker. Do not cut MC106 dc, 105 ch-1 sp (111 dc, 110 ch-1
sp: 116 dc, 115 ch-1 sp)
Turn so the RS is
facing you.
Row 3: (RS) w/CC1, join with a St Sc
in the 1st dc, [ch5, (sk the next ch-1 sp, sk the next dc) twice,
keeping your ch to the RS- sl st in the next ch-1 sp 2 rows below, ch5, (sk the
next dc, sk the next ch-1 sp) twice, sc in the next dc from the current row]
repeat across, ending with a sc in the 3rd ch of the beg ch-4. Cut
CC1. 21 chevrons (22 chevrons, 23 chevrons)
Row 4: (RS)
remove the stitch marker and place the MC loop on the hook, ch2, sc in the 1st
sc, [(ch1, working behind the ch5 space- dc in the next dc 2 rows below) 4x,
ch1, sc in the next sc] repeat across. Put the loop on the stitch marker. 84
dc, 22 sc, 105 ch-1 sps (88 dc, 23 sc, 110 ch-1 sps: 92 dc, 24 sc, 115 ch-1 sps)
Row 5: (RS)
w/CC1, join with a St Sc in the 1st sc, [ch5, (sk the next ch-1 sp,
sk the next dc) twice, keeping your ch to the RS- sl st in the next ch-1 sp 2
rows below, ch5, (sk the next dc, sk the next ch-1 sp) twice, sc in the next sc
from the current row] repeat across. Cut CC1. 21
chevrons (22 chevrons, 23 chevrons)
Turn so
the WS is facing you.
Row 6: (WS)
remove the stitch marker and place the MC loop on the hook, ch2, sc in the 1st
sc, [(ch1, sk ch-1 sp, dc in the next dc) 4x, ch1, sk ch-1 sp, sc in the next
sc] repeat across. 84 dc, 22 sc, 105 ch-1 sps (88 dc, 23 sc, 110 ch-1 sps:
92 dc, 24 sc, 115 ch-1 sps)
Row 7: (RS) ch4,
turn, (sk ch-1 sp, dc in the next st, ch1) repeat across, dc in the last st. 106 dc, 105 ch-1 sp (111 dc, 110 ch-1 sp: 116
dc, 115 ch-1 sp)
Rows 8-13:
Repeat Rows 2-7 using CC2 on Rows 3 & 5.
Rows 14-19:
Repeat Rows 2-7 using CC3 on Rows 3 & 5.
For
S/M:
·
Always
finish on a Row 7.
·
For
the 2 front panels: Repeat Rows 2-19 until you reach 12.5” wide per panel.
·
For
the back panel: Repeat Rows 2-19 until you reach 25” wide.
For
L/XL:
·
Always
finish on a Row 7.
·
For
the 2 front panels: Repeat Rows 2-19 until you reach 13.75” wide per panel.
·
For
the back panel: Repeat Rows 2-19 until you reach 27.5” wide.
For
2X/3X:
·
Always
finish on a Row 7.
·
For
the 2 front panels: Repeat Rows 2-19 until you reach 15.5” wide per panel.
·
For
the back panel: Repeat Rows 2-19 until you reach 31” wide.
Assembly:
With the RS
of the panel facing you and the foundation chain at the bottom, the left edge
will be the TOP of your garment. Make sure all the loose ends from the colored
yarns are woven in or tucked in on the top edge of your panels.
Marking
the Neck:
On the back
panel, find the center top and then measure 3.5 inches to the right of center
and place a marker, then measure 3.5 inches to the left of center and place a
marker.
On the front
panels, decide which is the left side and which is the right side and measure
7” down from the neckline corners and mark those stitches.
Assembling
the shoulders:
With wrong
sides of a front panel and the back panel together- match up the corners and
stitches, sew your top edges together up to the marked stitch on the back
piece. You should have 3.5 inches of unworked edge on the front piece. Finish
off.
Secure your ends and repeat for the second front panel,
working from the opposite corner towards the middle and stopping at the marked
stitch on the back piece. Finish off.
Center: With wrong sides together, working from the bottom, sew the center together until you reach the marked stitches. Finish off.
Side Seams: From the top edge of the outside corner, for
the armholes, measure down 8” from the corner and place a marker through both
thicknesses at that spot. When sewing your side seams together (with wrong
sides together) make sure to stop at that marker. Finish off.
Make sure all your ends are tucked in before doing the
fringe edge.
Fringe Instructions:
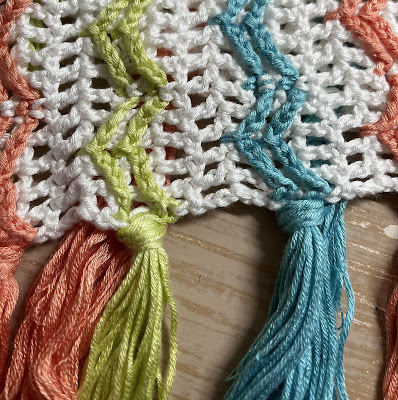
The fringe is made up of tassels using each of the CC
colors. Each fringe is 20 wraps around the 6” piece of cardboard- OR just cut
twenty 12” pieces of yarn for each tassel.
Apply the tassel from the backside of your work by poking
your hook from front to back through the edge of the stitches at the base in
between the chevron rows, then pull the full bundle through so you have a loop
on the backside, leaving the remainder on the front of the work. Then wrap all the ends around your hook and
pull through the loop on the back side. This will make sure you finish each
tassel with a pretty edge on the front side of your work.

.png)


.png)


Amazing story.
ReplyDeleteGood to go.
ReplyDeleteThis comment has been removed by a blog administrator.
ReplyDelete