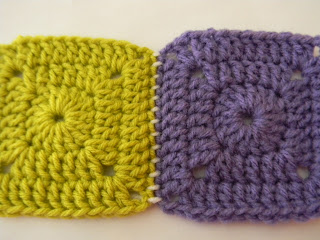
This is my style for whipstitching just about every afghan square together, no matter what blanket I am making. If I am making a blanket with very specific colors, I make sure that the yarn I am using for assembly matches my square edging so that my assembly does not stick out like a sore thumb. However, if I am making a scrap afghan, I will just use the yarn from the square that I am currently working on to attach to the next square.
This first picture shows the length of yarn I typically leave on the square (of this size) so that I can attach it to another scrap square.
 Then I will weave my yarn through the back loops of the next two stitches so that I can get over to the "corner". It makes it look so much neater.
 This picture shows that I am in the corner and ready to start whipstitching in the "next" stitch, which I will show you in the next set of pictures.
 Here the squares are facing you with their "right sides".
 Put the "right sides" of your squares together.
 This would be the "next stitch" from the corner as shown in the previous pictures. Insert needle from back to front of work.
 Go through all four loops, matching up stitch for stitch on both squares.
 Here you see the yarn through all four of the first set of loops.
 Now entering from the same direction as the first set of stitches, do it again. Go through all four loops. You are essentially sewing a "circle" through your stitches.
 See how the yarn makes a "circle" or "loop" over the stitches as you pull your yarn through?
 Continue down the length of the square.
  I always "end" my whipstitching where I "started" my whipstitching so that my sides are even. I always start my square in the "corner" and end in the "corner". First stitches only, otherwise you will end up throwing off your edging. Every single square gets whipstitched together the exact same way. That way when you go to do your edging and assembly everything fits together perfect, regardless of yarn differences that may make one square stitch up slightly smaller than another. It won't matter to you because you made sure that you had the right amount of stitches at the end of your square and you whipstitched every one of them the same.
 Voila, we are done. This is what your whipstitching will look like from the front of your work, with your right sides facing you again.

.png)


After all the years of crocheting, I have found an easier and better looking way to join blocks. Hold each block with wrong sides together and whipstitch through back loops only. If you use one of the main colors of the last row, it will 'disappear' when finished.
ReplyDeleteHi Charlotte. :)
ReplyDeleteThat sounds like a good way too. It's all personal preference. I don't care for the ridge the front loops make when sewing the back loops only. But, if you like it....hey, there ya go. :)
Thanks for posting this. My question is do the make strips of the squares and then whip stitch the strips? Or do you whipstitch them is blocks of 4 squares? What do you recommend?
ReplyDeleteI do both. You have to whipstitch your squares together in order to make strips. Then, once you have the border around your strips, you have to once again whipstitch your strips together.
ReplyDeleteSo glad I found this today! I'm definitely a beginner, so this will work wonderfully for me. Hopefully my stitches will be as neat as yours one day! Thank you for writing all these wonderful posts and patterns.
ReplyDelete~Deanna