
The Custom Sweater is Done!!


I thought I would end up posting weekly updates on the custom sweater, but it turned out to be more than I could handle- doing both crocheting and blogging- so I chose crocheting. I was under a timetable and I kept running into problem after problem, so I did what I do best in stressful times and I hid.

The squares took longer than anticipated. There was a ton of mental math in figuring out the zig-zag side of the sweater. It was just a LOT. But!!! I persevered and here we are - DONE! Not only done, but the recipient of the sweater LOVES it. She said that she had always wanted a sweater like that, and I made her dream come true.

I just want to share some in-progress pictures with you since I didn't post them before. I won't be sharing a pattern for this because it is not my design. The original was created by Shop Fluffy and I took inspiration for this sweater from the original to create one for my cousin's daughter-in-law. I won't ever make this sweater again. She has a one-of-a-kind. My cousin told her she's the only one on the planet with a sweater like that and she's not wrong! Haha!

This was actually close to the end as I was beginning to put pieces together.

After I wrote down all the square/flower combinations that were in the original sweater I wrote down a list of the rest of the color combinations that would work. Then, I made all my inside circles for my squares, and finish off the outside colors leaving a front loop section to add my flowers to later.


Now I am separating them out into stacks of inside/outside combinations and putting their "flower" color on top of the piles so I can keep track of what I have to work on.

I added the flower petals on last because it was easier to attach them to the already finished squares instead of fighting with them while I was adding the background color on. That is the way the original pattern had you do it. The pattern I used. Plus, I didn't like the look of the finished petals being caught up by the main color. When I added them afterward, they sat on top of the background color which I felt was a "cleaner" look. You can see it better in the next picture.

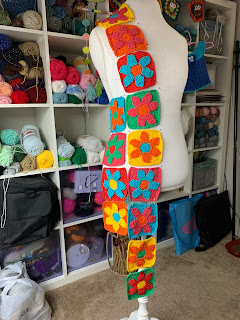
As I was working along, I needed to get an idea of how the squares were going to sit on the body, so I pinned squares to my body form. Let's just be real honest here, that body form is for "looks" only! If I make any more custom sweaters I am going to invest in an actual sewing body form. This thing has an 18" waist and that is not the norm for most people. I was a child the last time I was that small! Nevertheless, it helped me to get an idea of how far down I needed to go to get the car coat length they were wanting.


BUT! Then came the day when all the squares were made. ALL. THE. SQUARES!!! I could hear the angels singing the Hallelujah chorus!


I used a simple sc, ch1, sc back and forth between the squares to create a lacey, webbed look between the squares like the original sweater.

The square side went together swimmingly. This was definitely not the challenging part of the sweater. It already weighs about 2 pounds at this point. Cotton is unbelievably heavy when there is a lot of it in one place.

Nope, the real challenging part of this sweater, for me, was the zig-zag portion.
A- Before this sweater, I almost NEVER made zig-zag anything.
B- Surprisingly, math gives me anxiety. LOL
It took me a little bit of figuring out, ripping out, and refiguring, but I got my zig-zag section going.

After the initial freaking out was over, it actually became sort of a fun challenge to see if I could do this. Things like shoulder widths and where its going to hit on the neck are things you don't think of in a simple square construction. But, zig-zags make everything different because you have to account for the depths of the zigs and the zags. STRESSSSSS. That's how you spell zig-zag. Hahaha!!

I pinned the pieces together to get an idea of where things were going to lay and whether or not I had to rip a bunch of stuff back. But, things were matching up! Miracle of miracles!

I completed the zig-zag section before attaching it to the square side. At this point, I didn't know it, but I was going to have to undo the side seam and add another small section of colored rows because it was not laying correctly across the bosom section and the sleeve area was just too small.

And then I got to work on the sleeves. I got them all done and found out I made them WAYYYY too long. They would have been dragging on the ground. It was so ridiculous I just busted out laughing as soon as I saw it...and then proceeded to immediately alter them. The square sleeve was easy...just take off a row of squares. (I put them on my head like a headband, because what else was I going to do with four random flower squares?)

As you can see, I'm super impressed with myself. But, hey, we are being real here, right??


It did have to come back for a fitting, and I remade the edging around the front and neck section, pulling the neck section tighter together because it just wants to fall off her thin shoulders due to its weight. The sweater was easily 5-ish pounds when it was done. Cotton is soooo heavy. That's one of the reasons why it's nice when you can find a cotton blend yarn. It really takes some of the weight out of the finished project. There are no buttons on the front to keep it closed. The original, also, did not have buttons. She was happy with her sweater, and that is all I could ask for.


I pray she is blessed by the love put into each stitch, and the love of her family for thinking so much of her to have a custom sweater ordered for her.
When you order something from a small handmade business, it's a genuine compliment to not only the maker but also to the recipient.
More than just showing off a sweater that I'm really proud of, I hope that you walk away from this post thinking about something you've wanted to tackle but seemed too hard. You can do it- You just have to start!
.png)


No comments:
Post a Comment