
Crafting Memories: Section 2 of the Memories Blanket CAL
I'm so excited!! Today, we are moving on to the second texture section of the Memories Blanket CAL!
Watch the live video where Deb and I discuss Section 2 and give you helpful tips and tricks:
The second square:
If you haven't done it already, make sure you grab the link to the second square of the week, the Cordelia Square. You'll need to complete your second 8-square strip to continue with the Section 2 pattern. Click the picture below to get this pattern:

If you have already completed your 8 square strip- then, it's time to focus on putting an edge on your squares, attaching it to Section 1 (instructions provided below in the pattern), and moving on to Section 2.
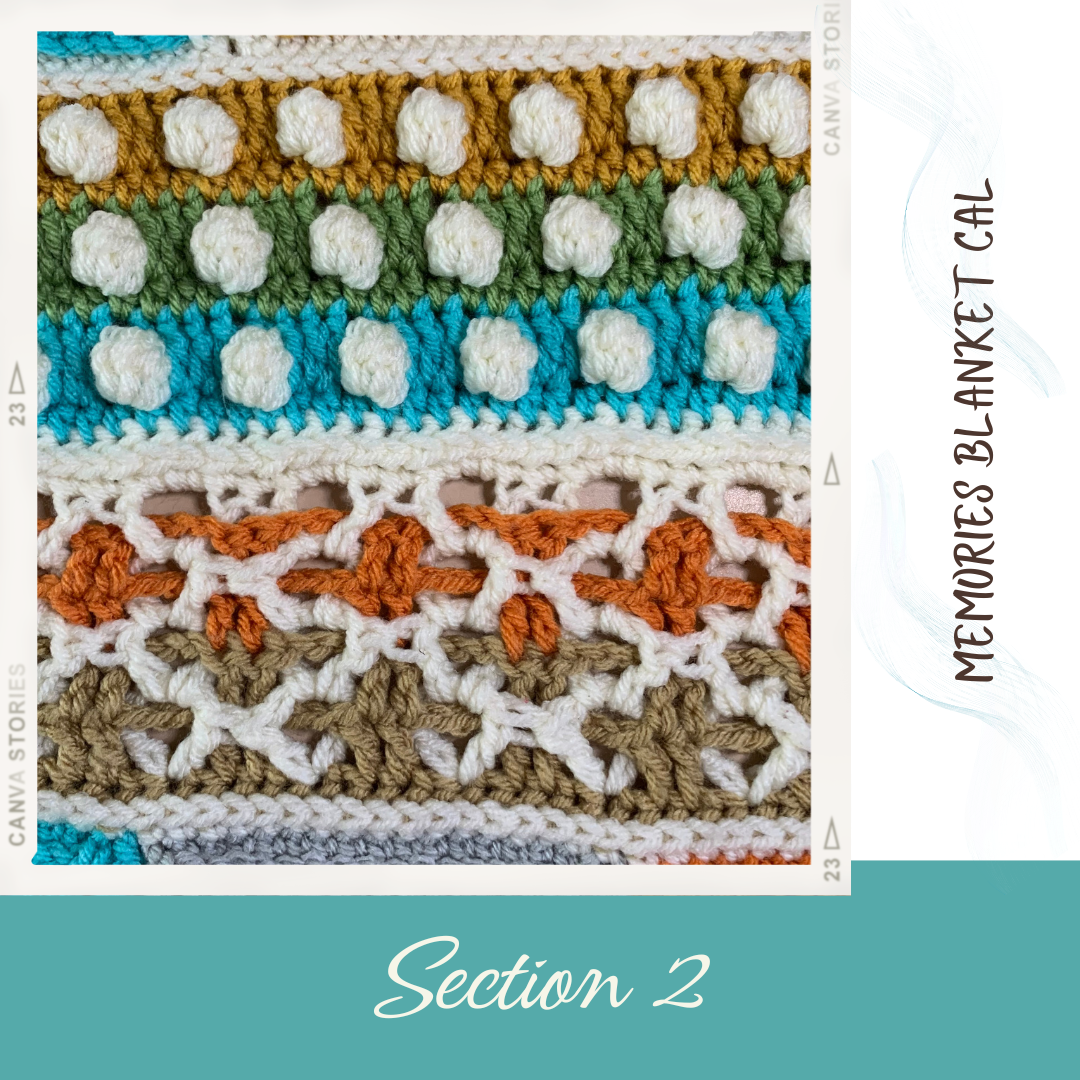
We'll be incorporating some classic crochet stitches like US dc's and chains, but Section 2 will be our most challenging section of the whole blanket. The first portion of the pattern focuses on the Interlocked Diamond stitch, which can be a little tricky to start with but once you have the stitch pattern down- it's so much fun! It truly makes you feel like a crochet genius in the end because it's so simple to do, but looks way more intricate.
There is a helper video linked below for you to get the hang of working the Interlocked Diamond, and unless you're already familiar with how to work it, I recommend giving it a look. The rest of the second section will focus on rows of chunky clusters and US dc's.
Let's talk colors!
For this section, I varied my colors up a bit more. I stuck with my Main Color (MC) in Ivory, but I used more contrasting colors to start incorporating more of the colors I used for the Cordelia Squares. Contrasting Color 1 (CC1) was the nutty brown again, Contrasting Color 2 (CC2) was the cheerful orange, Contrasting Color 3 (CC3) was bright turquoise, Contrasting Color 4 (CC4) was a light sage color, and Contrasting Color 5 (CC5) was a mustardy gold yellow. Of course, feel free to let your imagination run wild and incorporate as many colors as your heart desires!
As you work through Section 2, take your time with the new stitches and savor each skill you learn or continue to master. You are creating a new memory with this blanket and we want it to be a happy one!
If you want the whole pattern now:
We have made the entire pattern available to you now in a PDF upgrade that includes charts and bonus video links, as well as being available to download in either US or UK terms. It is available for the discounted price of $11.99 through the length of the CAL. You are not required to purchase the PDF- as the patterns will be forever free to view on our blogs in US terms. But, if you ever find yourself in need of extra guidance or inspiration, or you just want it all in one place, don't forget that the option is there to upgrade.
MAKE SURE YOU DOUBLE-CHECK WHICH VERSION YOU ARE CLICKING!!!
Because of the digital nature of the product, there are no refunds.


So, are you ready to dive into Section 2?
Grab your yarn, your hook, and let's keep building a Memory!!
Note: Before we get started on Section 2, we need to put an edge on the top and bottom of our Cordelia Square strip.
Cordelia Square
Edges- Instructions are the same for the top & bottom
edges working lengthwise and RS facing you.
Top/Bottom: Using MC, starting on the far right side, attach to the first sc after the ch-1 sp with a St Sc, sc in the next 16 sc, (sk the ch-1 spaces and join sp between the squares- sc in the next 17 st) 6 times, sk the ch-1 spaces and join sp between the squares, sc in the first 10 st, sc dec, sc in the remaining 5 st, finish off. (135 sc)
NOW- we need to join our Section 1 to our Cordelia Squares strip.
To join the next square strip to the last section: (RS) of both pieces facing you. Whipstich through the top two loops of the Section and (coming from behind the stitch) around the post of the corresponding sc from the Strip above. This method will make the Strip look like you used a back post stitch.


**Now, we can start on the Section 2 Pattern.**
Section 2 Pattern: Attaching to the top side of the Cordelia Squares (find the link above), WS facing you. Pay particular attention to which side of your work is facing you when attaching a new color.
Section 2 Colors: CC1, CC2, CC3, CC4, CC5, MC
I used: MC- Ivory, CC1- Toasted Almond, CC2- Desert Glaze, CC3- Turquoise, CC4- Light Sage, CC5- Sungold
Abbreviations: US Terminology
(…) at end of Row or Round denotes stitch count
(…) x times- work instructions between parentheses the total number of times stated
(…) in next st- work all stitches between parentheses in the indicated st/sp
Beg- beginning
BPsc- back post single crochet
Ch- chain
Ch-sp/s- chain space/s
Ch-1 sp- chain 1 space (number denotes number of chains)
Chg- change
Cts- counts
Dc- double crochet
FPdc- front post double crochet
FPsc- front post single crochet
FPtr- front post treble crochet
Hdc- half double crochet
MR- Magic Ring
Rep- repeat
Rnd(s)- round(s)
RS- Right Side
Sc- single crochet
Sk- skip
Sl st- slip stitch
Sp- space
St- stitch(es)
Tr- treble crochet
WS- Wrong Side
YO- yarn over
Special Stitches:
5 Double Crochet Cluster
(5dcCL)- (yo, insert hook into the st, yo,
pull up a loop, yo, pull through two loops) 5x, yo, pull through all loops on
the hook.
Standing Double Crochet (St Dc)- BEGINNER Standing Double Crochet Stitch
Standing Half Double Crochet (St Hdc)- BEGINNER Standing Half Double Crochet Stitch
Standing Single Crochet (St Sc)- How to Crochet: Standing Single Crochet
NOTE: It is highly recommended that you watch the instructional video for the Interlocked Diamond Stitch to become familiar with the rhythm of the stitch. Then proceed with the pattern as written.
YOUTUBE Tutorial for Interlocked Diamond Stitch which occurs in Rows 22-29.
Row 21: (WS) Using CC1, attach to the first sc on the right with a St Sc, FPsc to the last sc, sc in the last sc, ch6, turn.(2 sc, 133 FPsc)
Row 22: (RS) sk 3sc, dc in 2, (ch3, sk3, dc in 2) repeat across to the last 4 sc, ch3, sk3, dc in the last sc, do not cut and do not turn, drop the stitch and put the loop on a stitch holder. (54 dc, 27 ch-3 sp)
Row 23: (RS) Using MC, working in front of the last row, attach MC with a sl st to the 2nd open/unworked sc of Row 21, ch6 (cts as dc + ch3 going forward), working behind the last row, dc in the same sp, still working behind the last row, dc in the center of the next 3 open sc’s from Row 21, ch3, *working in front of the last row, dc in the same sp, still working in front of the last row, dc in the center of the next 3 open sc’s from Row 21, ch3, working behind the last row, dc in the same sp, still working behind the last row, dc in the center of the next 3 open sc’s from Row 21, ch3 ; repeat from the * across to the last 2 dc, working in front of the last row, dc in the same sp, still working in front of the last row, dc in the center of the next 3 open sc’s from Row 21, ch3, working behind the last row, dc in the same sp, do not cut, drop the stitch and put the loop on a stitch holder, turn. (54 dc, 27 ch-3 sp)
Row 24: (WS) Replace CC1 onto your hook, ch6, make sure your MC loop and yarn are on backside before moving on or things will get tangled, skipping all of the MC stitches and working only in the CC1 stitches from the previous Row, (dc in each of the next 2dc from CC1 row, ch3) repeat across to the end, ch3, dc in the 3rd ch from the ch6 below. cut CC1, but do not turn. (54 dc, 27 ch-3 sp)
Row 25: (WS) Keeping the loop behind of the last CC1 row, replace the MC loop onto the hook and ch6, working in front of the last row, dc around the first ch-3 sp of the previous MC row, staying in front of the last row, dc in the next ch-3 sp of the previous MC row, ch3, *working behind the last row, dc in the same ch-3 sp, staying behind the last row, dc in the next ch-3 sp of the previous MC row, ch3, working in front of the last row, dc in the same ch-3 sp, staying in front of the last row, dc in the next ch-3 sp of the previous MC row, ch3; repeat from the * across to the last 2 dc, working behind the last row, dc in the same ch-3 sp, still working behind the last row, dc in the center of the next ch-3 sp, ch3, working in front of the last row, dc in the 3rd ch of the previous MC ch6 turning chain. do not cut, drop the stitch and put the loop on a stitch holder, turn. (54 dc, 27 ch-3 sp)
Row 26: (RS) Using CC2, attach to the first CC1 dc with a St Dc, ch3, make sure your MC loop and yarn are on frontside before moving on or things will get tangled, skipping all of the MC stitches and working only in the CC1 stitches from the previous Row, (dc in each of the next 2dc from CC1 row, ch3) repeat across to the end, ch3, dc in the 3rd ch from the ch6 below. do not cut and do not turn, drop the stitch and put the loop on a stitch holder. (54 dc, 27 ch-3 sp)
Row 27: (RS) Keeping the loop in front of the last CC2 row, replace the MC loop onto the hook and ch6, working behind the last row, dc around the first ch-3 sp of the previous MC row, staying behind the last row, dc in the next ch-3 sp of the previous MC row, ch3, *working in front of the last row, dc in the same ch-3 sp, staying in front of the last row, dc in the next ch-3 sp of the previous MC row, ch3, working behind the last row, dc in the same ch-3 sp, staying behind the last row, dc in the next ch-3 sp of the previous MC row, ch3; repeat from the * across to the last 2 dc, working in front of the last row, dc in the same ch-3 sp, still working in front of the last row, dc in the center of the next ch-3 sp, ch3, working behind the last row, dc in the 3rd ch of the previous MC ch6 turning chain. do not cut, drop the stitch and put the loop on a stitch holder, turn. (54 dc, 27 ch-3 sp)
Row 28: (WS) Replace CC2 onto your hook, ch6, turn, make sure your MC loop and yarn are on backside before moving on or things will get tangled, skipping all of the MC stitches and working only in the CC2 stitches from the previous Row, (dc in each of the next 2dc from CC2 row, ch3) repeat across to the end, ch3, dc in the dc from Row 26. Cut CC2. (54 dc, 27 ch-3 sp)
Row 29: (WS) Keeping the loop behind of the last CC2 row, replace the MC loop onto the hook and ch6, working in front of the last row, dc around the first ch-3 sp of the previous MC row, staying in front of the last row, dc in the next ch-3 sp of the previous MC row, ch3, *working behind the last row, dc in the same ch-3 sp, staying behind the last row, dc in the next ch-3 sp of the previous MC row, ch3, working in front of the last row, dc in the same ch-3 sp, staying in front of the last row, dc in the next ch-3 sp of the previous MC row, ch3; repeat from the * across to the last 2 dc, working behind the last row, dc in the same ch-3 sp, still working behind the last row, dc in the center of the next ch-3 sp, ch3, working in front of the last row, dc in the 3rd ch of the previous MC ch6 turning chain. do not cut, ch1, turn. (54 dc, 27 ch-3 sp)
Row 30: (RS) sc in the first dc- going through the dc from Row 28 as well, (3sc in ch-3 sp, sc in 2dc) repeat across to the last ch-sp, 3sc in ch-sp, sc in the last st- going through both dc’s of Row 28 & Row 29, do not cut, ch1, turn. (135 sc)
Row 31: (WS) sc in first sc, FPsc to the last sc, sc in the last sc, cut MC. (133 FPsc, 2 sc)
Row 32: (RS) Using CC3, attach with a St Hdc in the first sc, hdc in each st across, cut CC3. (135 hdc)
Row 33: (WS) Using MC, attach with a St Dc in the first hdc, dc in the next, (ch3, sk3, 5dcCL in the next) repeat across to the last 5 st, ch3, sk3, dc in the last 2 hdc, cut MC. (4 dc, 32 CL, 33 ch-3 sp)
Row 34: (RS) Using CC3, attach with a St Sc to the first dc, sc in the next, (working in front of the ch-3 and into the open hdc from Row 32- dc in the next 3, sc in the CL) repeat across to the last ch-3 sp, dc in the next 3 open stitches from Row 32, sc in the last 2 dc, cut CC3. (36 sc, 99 dc)
Row 35: (RS) Using CC4, repeat Row 32, cut CC4. (135 hdc)
Row 36: (WS) Using MC, attach with a St Dc to the first hdc, ch2, sk2, 5dcCL in the next, (ch3, sk3, 5dcCL in the next) across to the last 3 st, ch2, sk2, dc in the last hdc, cut MC. (2 dc, 2 ch-2 sp, 32 ch-3 sp, 33 CL)
Row 37: (RS) Using CC4, attach with a St Sc in the first dc, working in front of the the ch-2 and into the open hdc from Row 35- dc in the next 2, sc in the CL, (working in front of the ch-3 and into the open hdc from Row 35- dc in the next 3, sc in the CL) repeat across to the last ch-2 sp, dc in the next 2 open stitches from Row 35, sc in the last dc, cut CC4. (35 sc, 100 dc)
Rows 38-40: Using CC5 & MC, repeat Rows 32-34.
© Bizzy Crochet and Design, 2024
Make sure you share your progress with us in the Bizzy Crochet CAL FB Group!
.png)


cute
ReplyDelete