

Crafting Memories: Section 4 of the Memories Blanket CAL
It's already the second to last week of the Memories CAL. It feels like this is going too fast now. *sad face* But, this week's pattern is going to be a relaxing make right before we ramp up to finish the blanket completely!
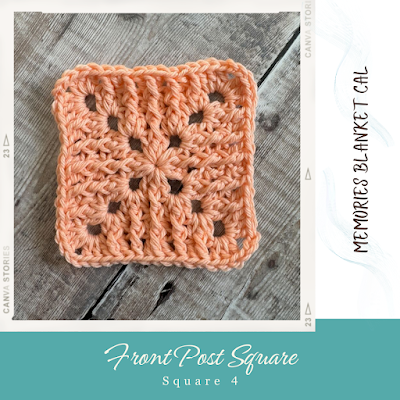
The fourth (and final) square:
If you haven't done it already, make sure you grab the link to the fourth and final square of the CAL, the Front Post Square. You'll need to complete your second 8-square strip to continue with the Section 4 pattern. Click the picture below to get this pattern:
Section four is going to be such an easy section for you. This one only uses double crochets and front post double crochets. And after making the Front Post Square, you should be able to tackle this section, no problem. :) There is just a little bit of open work with some chain one spaces in the very first part of Section 4, then you will finish up with the Waffle Stitch in the second part. If you LOVE chunky crochet pieces, then this is the one for you!
There really aren't any super tips or tricks that come along with this section. It is really very straightforward as to what you will be doing and the instructions are very simple. :)
Let's talk colors!
For this section, I used solids in both patterns. If you really want to infuse color changes into either section, this would be a great place to bring in a variegated or some other sort of color-changing yarn. Contrasting Color 1 (CC1) is Sungold, Contrasting Color 2 (CC2) is Toasted Almond, and my Main Color (MC) is Ivory.
Enjoy the simplicity of this section. It's another part of the blanket that helps bring some 'calm' to the "color chaos"- hahaha!
If you want the whole pattern now:
We have made the entire pattern available to you now in a PDF upgrade that includes charts and bonus video links, as well as being available to download in either US or UK terms. It is available for the discounted price of $11.99 through the length of the CAL. You are not required to purchase the PDF- as the patterns will be forever free to view on our blogs in US terms. But, if you ever find yourself in need of extra guidance or inspiration, or you just want it all in one place, don't forget that the option is there to upgrade.
MAKE SURE YOU DOUBLE-CHECK WHICH VERSION YOU ARE CLICKING!!!
Because of the digital nature of the product, there are no refunds.


So, are you ready to dive into Section 4?
Grab your yarn, your hook, and let's keep building a Memory!!

Note: Before we get started on Section 4, we need to put an edge on the top and bottom of our Front Post Square strip.
Front Post Square Edges- Instructions are the same for the top & bottom edges working lengthwise and RS facing you.
Top/Bottom: Using MC, starting on the far right
side, attach to the first ch-3 sp with a St Sc, (sc in the next 15 st, sc in
the next ch-3 sp, sk the join sp between the squares, sc in the next ch-3 sp) 7
times, sc in the next 10 st, sc dec, sc in the next 3 st, sc in the last ch-3
sp, finish off. (134 sc, 1 sc dec)
NOW- we need to join our previous Section 3 to our Front Post Squares strip.
To join the next square strip to the last section: (RS) of both pieces facing you. Whipstich through the top two loops of the Section and (coming from behind the stitch) around the post of the corresponding sc from the Strip above. This method will make the Strip look like you used a back post stitch.


**Now, we can start on the Section 4 Pattern.**
Section 4 Colors: CC1, MC, CC2
I used: MC- Ivory, CC1- Sungold, CC2- Toasted Almond
Abbreviations: US Terminology
(…) at end of Row or Round denotes stitch count
(…) x times- work instructions between parentheses the total number of times stated
(…) in next st- work all stitches between parentheses in the indicated st/sp
Beg- beginning
BPsc- back post single crochet
Ch- chain
Ch-sp/s- chain space/s
Ch-1 sp- chain 1 space (number denotes number of chains)
Chg- change
Cts- counts
Dc- double crochet
FPdc- front post double crochet
FPsc- front post single crochet
FPtr- front post treble crochet
Hdc- half double crochet
MR- Magic Ring
Rep- repeat
Rnd(s)- round(s)
RS- Right Side
Sc- single crochet
Sk- skip
Sl st- slip stitch
Sp- space
St- stitch(es)
Tr- treble crochet
WS- Wrong Side
YO- yarn over
Special Stitches:
Standing Double Crochet (St Dc)- BEGINNER Standing Double Crochet Stitch
Standing Half Double Crochet (St Hdc)- BEGINNER Standing Half Double Crochet Stitch
Standing Single Crochet (St Sc)- How to Crochet: Standing Single Crochet
Row 60: (WS) Using CC1, attach to the first sc
on the right with a St Sc, FPsc to the last sc, sc in the last sc, ch3, turn. (2
sc, 133 FPsc)
Row 61: (RS) dc in 5, (ch2, sk2, dc in 6) repeat across to the last sc, dc in last sc, ch1, turn. (103 dc, 16 ch-2 sp)
Rows 62: (WS) sc in each dc, 2sc in each ch-2 sp across, ch3, turn. (135 sc)
Row 63: (RS) dc in 1, (ch2, sk2, dc in 6) repeat across to the last 5, ch2, sk2, dc in last 3, ch1, turn. (101 dc, 17 ch-2 sp)
Row 64: (WS) Repeat Row 62.
Row 65 & 66: Repeat Rows 61 & 62. Cut CC1.
Row 67: (RS) Using MC, attach to the first sc with a St Sc, sc in each sc across, ch1, turn. (135 sc)
Row 68: (WS) sc in first sc, FPsc to the last sc, sc in the last sc, cut MC. (133 FPsc, 2 sc)
Row 69: (RS) Using CC2, attach to the first sc with a St Dc, dc in each st, ch3, turn. (135 dc)
Row 70: (WS) (dc in next dc, FPdc around next 3) repeat across to the last 2, dc in last 2 dc, ch3, turn. (36 dc, 99 FPdc)
Row 71: (RS) (FPdc around next dc, dc in 3) repeat across to the last 2, FPdc around the next st, dc in the last st, ch3, turn. (34 FPdc, 101 dc)
Rows 72-74: Repeat Rows 70 & 71 once, Repeat Row 70 once more. Cut CC2
© Bizzy Crochet and Design, 2024
Make sure you share your progress with us in the Bizzy Crochet CAL FB Group!
.png)


No comments:
Post a Comment