Showing posts with label crochet youtube videos. Show all posts

Tuesday, July 16, 2019

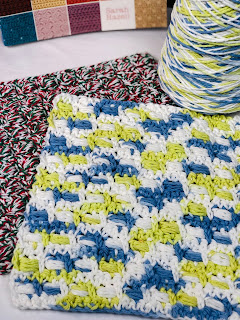
Stitch of the Week #11- Almond Tiles


Gentle Waves Dishcloth

Stitch of the Week #11- Almond Tiles

YouTube Tutorial Here

Materials Needed:


2oz total- #4/Worsted Weight Cotton (used I Love This Cotton by Hobby Lobby)
#7/4.5 mm Hook
Lg eye needle for weaving ends
Scissors

For the best effect, use two colors for this pattern.

Finished size: 10” W x 9” H

Notes:

Ch3 at the beginning of a row cts as a dc

Abbreviations- US terms:

Ch- chain
cts- counts
dc- double crochet
long dc- long double crochet
sc- single crochet
sp- space
st- stitch
trc- treble crochet
yo- yarn over


 Pattern:

R1- With Color 1, ch 41, sc in 2nd ch from hook and each across (40)

R2- ch1, turn, sc in each sc across. (40) Cut Color 1, change to Color 2

R3- ch1, turn, (*sc in 1, hdc in next 2, dc in next 2, trc in next 2, dc in next 2, hdc in next 2, sc in next 1*, ch2, sk2) 2 times, repeat * to * once. (36)

R4- ch1, turn, Repeat R3. (36) Cut Color 2, change to Color 1

R5- ch1, turn, (sc in 12 st, long dc over the ch2 sp into each of the open sc three rows below) twice, sc in last 12 st. (40)

R6- ch1, turn, sc in each st across. (40) Cut Color 1, change to Color 2

R7- ch3 (cts as dc), turn, dc in 1, hdc in 2, sc in 1,(ch2, sk2, sc in 1, hdc in 2, dc in 2, trc in 2, dc in 2, hdc in 2, sc in 1) twice, ch2, sk2, sc in 1, hdc in 2, dc in last 2. (34)

R8- ch3, turn, Repeat R7. (34) Cut Color 2, change to Color 1

R9- ch1, turn, sc in 5, long dc over the ch2 sp into each of the open sc three rows below, (sc in 12, long dc over the ch2 sp into each of the open sc three rows below) twice, sc in the last 5. (40)

R10- ch1, turn, sc in each st across. (40) Cut Color 1, change to Color 2

R11-30- Repeat R3-10 twice, Repeat R3-6 once.

Finish off and tuck in ends.

© Copyright Bizzy Crochet 2019


Thursday, May 30, 2019

Stitch of the Week #10- Perforated Pattern


Perforated Pattern Dishcloth

Stitch of the Week #10

Click here for the video instructions!

Materials Needed:

oz total- #4/Worsted Weight Cotton (used I Love This Cotton by Hobby Lobby)
#7/4.5 mm Hook
Lg eye needle for weaving ends
Scissors


Finished size: 9” W x 9” H

Notes:

Ch3 at the beginning of a row cts as a dc

Abbreviations- US terms:

Ch- chain
cts- counts
dc- double crochet
sc- single crochet
sk- skip
sp- space
st- stitch


 Pattern:

R1- ch 41, sc in 2nd ch from hook and each across (40)

R2- ch3, turn, (dc in 6 sc, ch2, sk 2) across, dc in the last 7 sc.

R3- ch1, turn, sc in each dc, 2sc in each ch2 sp across (40sc)

R4- ch3, turn, dc in 2sc, (ch2, sk 2, dc in 6sc) across to last 5, ch2, sk2, dc in last 3sc.

R5- ch1, turn, sc in each dc, 2sc in each ch2 sp across. (40sc)

R6-25- repeat R2-5

You can finish off with a sc border if you like. Watch the video if you need instructions for a border.  


Friday, May 17, 2019

Stitch of the Week #9- Rice Stitch


Rice Stitch Dishcloth

Stitch of the Week #9

Click here for Video Instructions!


Materials Needed:


2oz total- #4/Worsted Weight Cotton (used I Love This Cotton by Hobby Lobby)
#7/4.5 mm Hook
Lg eye needle for weaving ends
Scissors

I Love This Cotton is 30% off through May 18th!PLUS- Free Shipping on orders of $59 or more at hobbylobby.com. Some exclusions apply. Free Shipping ends 11:59pm PST on 5/18/19.


Finished size: 8” W x 8” H

Notes:

Ch2 at the beginning of a row counts as hdc throughout

Abbreviations- US terms:

Ch- chain
cts- counts
dc- double crochet
fpdc- front post double crochet
bpdc- back post double crochet
sp- space
st- stitch
yo- yarn over


 Pattern:

R1- with color 1, ch 37, dc in the fourth ch from the hook and each ch across.

R2- ch2, turn, sk first dc, (fpdc ar the next dc, bpdc ar the next dc) to the last 2 st, fpdc ar the next dc, hdc in the turning ch.

R3-21- Repeat R2.

This dishcloth does not require a border.


© Bizzy Crochet and Design 2019

Friday, May 10, 2019

Stitch of the Week #8- Catherine Wheel


Catherine Wheel Dishcloth

Stitch of the Week #8

YouTube Video Tutorial Available

Materials Needed:

 2oz total- #4/Worsted Weight Cotton (used I Love This Cotton by Hobby Lobby)
#7/4.5 mm Hook
Lg eye needle for weaving ends
Scissors

For the best effect, use two colors for this pattern.

Finished size: 7” W x 9” H

Specialty Stitches:

Cluster: (yo, insert hook, yo, draw up loop, yo, draw through 2 loops) over the indicated number of stitches, yo, draw through all loops on the hook.

Ch3 at the beginning of a row counts as dc throughout

Abbreviations- US terms:

Ch- chain
cts- counts
dc- double crochet
sc- single crochet
sk- skip
sp- space
st- stitch
yo- yarn over


 Pattern:

R1- with color 1, ch 37, sc in the second ch from the hook, sc in the next ch, (sk 3ch, 7dc in next, sk 3ch, sc in 3ch) 3x, sk 3ch, 4dc in last ch. Change color

R2- w/color 2, ch1, sc in first 2st, *ch3, work Cluster over the next 7st, ch3, sc in the next 3st; repeat from * to last 4st, ch3, Cluster over the last 4st. Do NOT change color.

R3- ch3, turn, 3dc in the first st, *sk 3ch, sc in each of next 3sc, sk 3ch, 7dc in loop that closed the next Cluster; repeat from * and end by skipping 3ch and sc in last 2 sc, Change color

R4- w/ color 1, ch3, sk first st, Cluster over the next 3st, *ch3, sc in each of the next 3 st, ch3, Cluster over the next 7st; repeat from * to end, ch3, sc in the last st, sc in turning ch, Do NOT change color.

R5- ch1, sc in each of next 2sc, *7dc in the loop that closed the next Cluster, sk 3ch, sc in each of next 3sc; repeat from * to end, 4dc in turning ch. Change color

R6-20- Repeat R2-R5, ending with a R4.

Edge the top and bottom with a row of sc across.


© Bizzy Crochet and Design 2019

Friday, May 03, 2019

Stitch of the Week #7- Crossed Ripple


Crossed Ripple Dishcloth

Stitch of the Week #7

Video Tutorial available here

Materials:

2oz total- #4/Worsted Weight Cotton (used I Love This Cotton by Hobby Lobby)
#7/4.5 mm Hook
Lg eye needle for weaving ends
Scissors

Finished size: 8.5” W x 8.75” H

Abbreviations- US terms:

Ch- chain
cts- counts
dc- double crochet
fpdc- front post double crochet
sc- single crochet
sk- skip
sp- space
st- stitch
yo- yarn over


 Pattern:

R1- ch 36, sc in the second ch from the hook and each ch across (35)

R2- ch3 (cts as dc), turn, *sk 2sc, dc in the next sc, ch1, count back two sk sc, dc in the first sk sc, repeat from * to the last sc, dc in the last sc. (11 crossed stitches)

R3- ch1, turn, sc in each dc and ch1 across. (35)

R4- ch2 (cts as dc going forward), turn, *sk 2sc, dc in the next sc, ch1, fpdc around the right leg of the “X” stitch below, repeat from * to the last sc, dc in the last sc. (11 crossed ripple stitches)

R5-28- repeat R3 & R4

R29- repeat R3.

If you want to finish the dishcloth with a sc border, don’t cut the yarn. Ch1, turn, and put a sc in each sc across the top, ch2, turn the cloth and put 2sc in each dc row end and 1sc in each sc row end down the side. Repeat for the bottom and opposite side. Slip stitch to the first sc.

If you don’t want to finish with a sc edge, simply cut your yarn after R29 and weave your ends.


© Bizzy Crochet and Design 2019

Friday, March 29, 2019

Stitch of the Week #2- Boxed Beads


Scrubbing Bubbles Dishcloth

Stitch of the Week #2- Boxed Beads

 Materials Needed:
2oz total- #4 Worsted Weight Cotton Yarn. (Dark sample used Bernat Handicrafter Cotton, and Light Sample used Sugar n Cream Cotton)
#7/4.5 mm Hook
Lg eye needle for weaving ends
Scissors
Note- The busier the variegated you use, the less you will see the boxed beads stitch from a distance.

Finished size: 8.5” W x 8.5” H


Abbreviations:

Ch- chain
dc- double crochet
sc- single crochet
xtsc- extended single crochet (see special stitches)
Slcl- slanting cluster (see special stitches)
yo- yarn over

Special Stitches:

Xtsc (Extended Single Crochet)- insert hook into space indicated, yo, pull up a loop, yo, draw through first loop only, yo, draw through the last two loops on the hook.

Slcl (Slanted Cluster)- dc in next st, *working around the post of this dc, yo and insert hook from front to back, yo, pull up a loop – repeat from * 2 more times, until you have 7 loops on your hook.  Yo, pull through 6 loops, yo and pull through last 2 loops.

 Pattern:

R1- ch 32, sc in the third ch from the hook, sc in next ch, xtsc in the next st, (sc in 2, xtsc in next) across (30)
R2- ch2, turn, (Slcl in the next st, sk next sc, xtsc in next st) across (30)
R3- ch2, turn, (sc in 2 st, xtsc in next) across (30)
R4-R21- Repeat R2 & 3.
Cut and tuck in ends.


I hope you enjoyed this week’s stitch pattern!

You can find me on Facebook ,  Instagram, and Pinterest. Make sure you come to say hello- and share your projects with me- I would love to meet you!              ~ Biz


*Some of the links contained on this webpage may be affiliate links which may generate additional revenue for Bizzy Crochet and Design.

Thursday, March 21, 2019

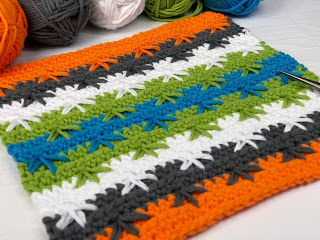
Stitch of the Week #1- Spike Cluster


You can join me on YouTube or use the following pattern...or both! 

Chicken Scratch Dishcloth

Stitch of the Week #1- Spike Cluster

Materials Needed:

2oz total- #4 Worsted Weight Cotton Yarn. (Sample used PaintboxCotton Aran * in Sky Blue, Lime Green, Slate Gray, White, and Seville Orange)
#7/4.5 mm Hook
Lg eye needle for weaving ends
Scissors
Note- If you want to achieve stripes, make sure that you choose colors that will stand out against each other.

Finished size: 9” W x 8” H

Special St:
Scl (Spike Cluster)- count down two rows and to the right two stitches, insert your hook in the space to the right of the second stitch to the right, yo, draw up a loop (not tightly), count straight down two rows below the current sc you are replacing, insert your hook in the space below the second stitch below, yo, draw up a loop, count down two rows and to the left two stitches, insert your hook in the space to the right of the second stitch to the left, yo, pull up a loop, yo, pull a loop through all 4 loops on the hook.   

Abbreviations:
Ch- chain
sc- single crochet
yo- yarn over


Pattern:

R1- ch 36, sc in the second ch from the hook, sc in each sc across (35)
R2-4- ch1, turn, sc in each sc across. (35) If you are striping- cut color after R4 and add new
R5- ch1, turn, sc in 5, (Scl in next st, sc in 5) across to the end. (35)
R6-8- ch1, turn, sc in each st across. (35) If you are striping- cut color after R8 and add new
R9- ch1, turn, sc in 2, (Scl in next st, sc in 5) across to last 3, Scl in next, sc in last 2. (35)
R10-12- ch1, turn, sc in each st across. (35) If you are striping- cut color after R12 and add new
R13-36- Repeat Rows 5-12 three times.
Cut and weave your ends.

I hope you enjoyed this week’s stitch pattern!
You can find me on Facebook, Instagram, and Pinterest. Make sure you come and say hello- and share your projects with me- I would love to meet you!             

~ Biz


Here's a free hot pad/potholder pattern of mine that would make a great accompaniment piece to these awesome dishcloths!

*Affiliate links are used in this post. You don't pay anything extra, but if you make a purchase I earn a small commission. I only link to what I personally use and believe in. 

Sunday, May 27, 2018

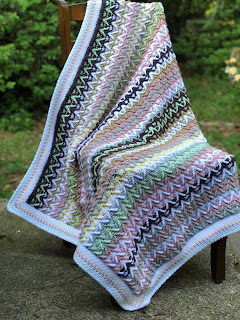
Fawn River Baby Blanket Pattern (free)

Fawn River Baby Blanket Pattern

© Bizzy Crochet and Design


Pattern Below

An ad-free PDF is available for purchase on Ravelry, or my Website.

The name came from a mixture of several suggestions from my Facebook friends. There were so many good ideas, and I wanted to incorporate them ALL! But, I decided to go with Fawn River because this blanket reminds me of a woodsy, serene place. 

Come lay with me beneath the big oak tree...Can you feel the soft, warm breeze? Can you hear the babble of the brook? Is the gentle sunlight dancing on your skin between the leaves?  It makes me want to take a nap and dream of my days as a child back on the farm. 

This pattern uses half double crochet (half treble for UK readers), and a front post double treble (UK front post triple treble) stitch. The border uses single crochet. If you know those stitches...you can make this blanket! It is so warm and squishy and thick and soft!!!

I have also made YouTube videos for the pattern and for the edging instructions. The blanket instruction video has an in-depth discussion about how to size your beginning chain for any size blanket/project. You can make dishcloths, pillows, blankets...whatever your heart desires. :)


Materials:
For Blanket: Worsted Weight/Aran/10 Ply


Original used: I Love This Yarn 4 ply Acrylic-


(7 oz skeins/252-355 yds)

9oz White
7oz Grey Mist
6oz Rosy Cheeks
6oz Toasted Almond
4oz Cream
4oz Menthe
5oz Graphite


Finished Size: 50” x 46” (washed & dried)


For Dishcloth: Worsted Weight/Aran/10 Ply
Original used: Various scraps of 100% cotton
1 oz per color roughly


Finished Size: 9.5” x 7.5”

G/4.0 hook
Scissors
Lg eye needle for weaving ends


NOTE: ch2 counts as hdc throughout pattern


US Terms to UK Terms:

US sc = UK dc               US hdc = UK htr           US ch = UK ch

US sl st = UK ss            US fpdtr = UK fpttr

More terms: sp=space, cts=counts, rem= remaining

BLO=Back Loop Only, FLO= Front Loop Only, st=stitch, sk= skip


Dishcloth Pattern:

Ch 39

R1- hdc in 3rd ch from hook and each ch across. (38 hdc-including turn ch)

R2- ch2, turn, hdc in each st across (38)


R3- ch1, turn, sk the first 3 hdc from R1, fpdtr around the next hdc from R1, sk the hdc on R2 behind the fpdtr just made, *hdc in the next 4hdc from R2, fpdtr around the hdc from R1 immediately to the left of the last fpdtr made, sk 4hdc on R1 after the last fpdtr just made, fpdtr in the next hdc from R1, sk 2hdc from R2 behind the fpdtr; repeat from * across, ending with hdc in each of the next 4hdc, fpdtr in the hdc from R1 immediately to the left of the last fpdtr made, sk the hdc after the fpdtr just made, hdc in the turning ch2.


LINK TO INSTRUCTIONAL VIDEO


R4- Repeat R2.


Repeat Rows 3 & 4 for the pattern, sample finished with 21 rows including one extra row of hdc after R4. Cut and sew in ends.


Baby Blanket Pattern:

Ch 165

R1- hdc in 3rd ch from hook and each (164 hdc- including turning ch)


R2- ch2, turn, hdc in each. (164)


R3- ch1, turn, sk the first 3 hdc from R1, fpdtr around the next hdc from R1, sk the hdc on R2 behind the fpdtr just made, *hdc in the next 4hdc from R2, fpdtr around the hdc from R1 immediately to the left of the last fpdtr made, sk 4hdc on R1 after the last fpdtr just made, fpdtr in the next hdc from R1, sk 2hdc from R2 behind the fpdtr; repeat from * across, ending with hdc in each of the next 4hdc, fpdtr in the hdc from R1 immediately to the left of the last fpdtr made, sk the hdc after the fpdtr just made, hdc in the turning ch2.


LINK TO INSTRUCTIONAL VIDEO


R4- ch2, turn, hdc in each st across.


Repeat R3 & 4 for the pattern. Sample has 102 rows- finishing with R4.


Want a different size blanket?

There is in an in- depth discussion in the YouTube Tutorial about how to make your beginning chain whatever size you need.


Edging:
NOTE: You want to have an odd number of stitches between your center corner stitches in order to correctly work the upcoming Moss Stitch. It isn’t the end of the world if you end up with an even amount- just go ahead and work that sc before your corner- no one will ever notice!!

Rd1- Using border color of choice, join in Top right corner of blanket with a ch1, 3sc in first hdc (corner made), sc in each hdc across top, 3sc in last hdc, working down the Left side- place 3sc per 2row repeat (ie, 102 rows = 153 sc), 3sc in the first hdc from the Bottom, sc in each st across the bottom, 3sc in the last hdc from bottom, Repeat Left side for the Right side. Join with sl st to first sc.


INSTRUCTIONAL VIDEO FOR EDGING

Rd2- sl st to center sc from corner stitches, ch1, 3sc in corner, sc in each sc around placing 3sc in each center sc from corner. Join.


Rd3- sl st to center sc, ch1, *3sc in corner, (ch1, sk1, sc in next) across to the next corner; repeat from * around, sl st to join. Cut Color.


Rd4- change color to an accent color, join with a ch1 in the center sc from the corner and Repeat Rd3. Sl st to join, cut color.


Rd5- change to main border color and repeat Rd3, sl st to join and cut.


Rd6-9- Repeat Rds 4 & 5. Finish with a main border color Rd 9.


Rd10- Repeat Rd3. Sl st to join, cut and finish off.


All rights reserved.  Please, feel free to contact me on social media with any questions concerning the pattern. If you do share pictures, please make sure they are your own…but, I would love it if you would tag & link to me!!

Also, you can sell anything you make from the pattern, but you may not sell the pattern or claim it as your own. Thanks!!

Saturday, March 10, 2018

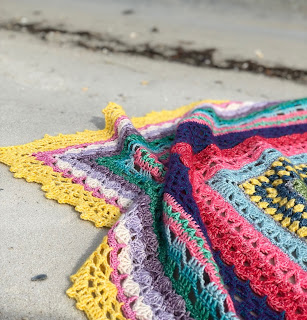
Kiss the Girl: Little Mermaid Inspiration Sampler Blanket Pattern

Kiss the Girl: 

Little Mermaid Inspiration Sampler Blanket Pattern

by Elizabeth Mareno


Kiss the Girl was designed as part of the Mermaid CAL that I hosted in April-May of 2018. This design was one of two. The other is called Under the Sea. Both designs feature characters and colors inspired by Disney's Little Mermaid movie from 1989. 

Little Mermaid is one of my favorite movies of all-time because the year that it came out on video I worked for a VHS video rental store and I watched this movie every time I worked. I knew every line by heart. Not just the songs- the WHOLE movie! Haha. So, when I was thinking about what I would want to create an inspiration blanket for, Little Mermaid was a no-brainer. 

Kiss the Girl is lacy styled blanket. It is as lovely as a baby blanket as it is for a best friend. The characters represented by various stitches throughout the blanket are:
Ariel
Flounder
Sebastian- using the Calypso Crab stitch which I created just for this blanket
Ariel's Sisters
Flotsam & Jetsam
Ursula
King Triton

I believe this blanket is an awesome chance to challenge yourself as a crochet artist. I have created, and freely supplied, videos on YouTube to help you through the pattern from beginning to end. 

Here is a link to the free Calypso Crab Granny Square pattern on my blog if you would like to play with the pattern a little more!


This pattern is available on ETSY and my Website.


Here is a list of supplies/materials in three different yarns. You may already have enough in your stash! If not, I've given you links to each of the yarns that were used to create the samples. 

Supplies/Materials

Each ball is 50-54g- dk weight- cotton/acrylic


Amazonite- 1 ball- used 19 g- Bubbles
Beryl- 3 balls- used 140 g- Flounder & King Triton Edge
Blue Apatite- 1 ball- used 30 g- Flounder
Canada Jade- 1 ball- used 39 g- Seaweed
Carnelian- 2 balls- used 81 g- Sebastian
Dark Amethyst- 2 balls- used 78 g- Ariel’s Shells & Ursula
Fosterite- 1 ball- used 38 g- Fins & Scuttle
Green Agate- 1 ball- used 28 g- Flotsam & Jetsam
Lilac Quartz- 1 ball- used 48 g- Ursula
Malachite- 1 ball- used 32 g- Sisters
Moonstone- 1 ball- used 38 g- Ursula
New Jade- 1 ball- used 19 g- Flotsam & Jetsam
Red Jasper- 1 ball- used 19 g- Ariel’s Hair
Rhodochrosite- 2 balls- used 92 g- Sisters & Scuttle
Smoky Quartz- 1 ball- used 32 g- Rocks
Tourmaline- 1 ball- used 31 g - Edging
Turquoise- 1 ball- used 24 g – Bubbles/ Flotsam & Jetsam
Yarra- 2 balls- used 82 g - Netting
Yellow Jasper- 1 ball- used 7 g- Center Medallion

3.75 mm/ F hook

Each ball is 100g- dk weight- 100% acrylic


#1114- Eindhoven- used 8 g- Medallion
#2003- Brugge- used 11 g- Ariel’s Shells
#1259- Groningen- used 12g- Fins
#1246- Maastricht- used 10 g- Ariel’s Hair
#1099- Wolvega- used 10 g- Bubbles
#1068- Den Helder- used 17 g- Bubbles
#2018- Pollare- used 74 g- Rocks & King Triton’s Edge
#1821- Terneuzen- used 11 g- Seaweed
#2008- Leuven- used 15 g- Flounder
#2011- Geraardsbergen- used 15 g- Flounder
#1725- Ameland- used 26 g- Sisters
#1132- Leek- used 28 g- Sisters
#1435- Apeldoorn- used 30 g- Sebastian
#1003- Middelburg- used 48 g- Netting
#1203- Heerenveen- used 18 g- Scuttle
#2004- Brussel- used 7 g- Scuttle
#1829- Wilnis- used 14 g- Flotsam & Jetsam
#2015- Bastogne- used 14g- Flotsam & Jetsam
#1422- Eelde- used 16 g- Flotsam & Jetsam
#2001- Antwerpen- used 22 g- Ursula
#1277- Amstelveen- used 18 g- Ursula
#1432- Heerlen- used 18 g- Ursula
#1257- Hilversum- used 18 g- Edging

4.00 mm / G hook

Worsted Weight Yarn: like I Love This Yarn  or Red Heart Super Saver 

Lime Green - 4 oz – Fins and Seaweed
Grape Purple- 5.5 oz- Ariel’s Shells and Ursula
Light Purple- 3oz- Ursula
White- 3oz- Ursula
Gold - less than an ounce- Center Medallion


Silver Gray- 4 oz- Bubbles & Scuttle
Turquoise -4 oz-Bubbles and Flotsam/Jetsam
Peacock- 3 oz- Flotsam/Jetsam
Ocean Blue- 6 oz- Sisters & Flotsam/Jetsam
Mango- 4 oz- Sisters
Red- 7 oz or you can use 2 different reds: 3 oz of one red for hair and 5 of another red for Sebastian- Ariel’s hair & Sebastian
Yellow- 4 oz- Flounder

Royal blue- 4 oz- Flounder
Graphite Gray- 4 oz- Rocks & Seaweed
Cornflower Blue- 6 oz- Netting
Buttercup Yellow- 7 oz- Scuttle & King Triton’s Edge
Tropical Pink- 3 oz- Edging


H hook
Large eye needle for sewing ends
Stitch marker


© Bizzy Crochet and Design 2018


Monday, October 27, 2014

Making a Case for Learning to Read a Written Pattern

As a designer and pattern writer, I have noticed a trend in the last few years toward video tutorials to learn new patterns, designs, stitches, etc. I have been asked many times if I have video tutorials for my patterns, and I am sad to say that I struggle in the technological side of things. It may actually be easier than I am thinking it is, but the thought of it overwhelms me so I haven't made any progress in that department. Maybe it will happen in the future. I hope so. (12/18/19 UPDATE: I do make videos now and my YouTube channel is here. You know I would love it if you would subscribe!)

With so many requests for videos, I have actually begun to be concerned that they are becoming a crutch for crocheters and knitters. Now, before you shoot me down, hear me out! I am a user of YouTube videos! I admit it! For example, even though I can usually figure out just about anything I have the hardest time working the Bavarian stitch from written instructions. 


                                                            Bavarian Stitch Afghan 

                                                  
                                                  Lush Garden Bavarian Stitch Afghan

It's like the words become gobblety-gook on the paper and I just can't make heads or tails of it. However, when I pop on over to YouTube and watch Crochet Geek's Bavarian stitch instructions, it all becomes clear and I can move forward with whatever project I'm wanting to start. I don't work the Bavarian stitch very often, so every time I get a hankering to do it- I have to look it up! [I even had to look it up to start my Lush Garden Bavarian Stitch Afghan (pictured above). I include a link to Crochet Geek's video in those instructions as well (no sense in trying to reinvent the wheel).] Another video that I recently watched was how to make a one-row buttonhole in knitting. I will never say that YouTube videos are wrong, or that they shouldn't be used. I'm just here to make a case for learning how to read a pattern. 

When I learned how to crochet my Grandmother sat me down with a hook and some yarn and gave me basic instructions. I made a newborn hat, and I learned how to make what is today called a "Magic Square" potholder. That was 35 years ago. There was no YouTube. I lived over 4 hours away from my Grandma, so I got very few lessons from her in person. I used my Mom's old wool from her knitting days and made really horrendous Barbie clothes. I remember seeing them years later and I didn't even recognize them as clothes. They were just blobs of yarn. At the time, though, they were the most brilliant, fashionable things my Barbie had ever owned! I made the yarn work for me! LOL 

When I was about 15-ish, I put my crochet hook away. I had a hard time making myself finish anything. I think it's just the age. I see the same thing happen with a lot of the young people I teach. They all start out wanting to make an afghan. I love the desire, I just know the drive isn't there and they probably won't finish it. I didn't pick a crochet hook back up until I was about 26. My daughter was 3 and we were at a craft fair. I saw these crocheted scrunchies and decided "Hey! I know how to do that!" I went to the grocery store (small town, USA), bought a skein of baby yarn and a D hook and took it home. I sat down with the scrunchy I bought and taught myself how to make it. From that moment on I was totally hooked on crocheting. I'm not proud to admit that there were days my kids lived on cheerios and yogurt...but, they did. I was a woman obsessed. 


An example of 90's crochet pattern books.
 Not exciting, unless you count the creepy clown pattern.
That's how I got my start, but...I was never taught to read a pattern. When I got back into crochet there were not a lot of pattern options, but there were some really cute designs I wanted to make for my kids. Still...I couldn't read a pattern. I couldn't stand what I was coming up with on my own, and I was SO LIMITED by only knowing how to do a single crochet and double crochet. I don't think I was even working chains and slip stitches correctly at the time. My husband's Grandmother walked me through learning how to make a granny square again, but, even then I was limited. So, I called my Grandma. She talked me through a half double crochet on the phone. Then, later, she talked me through what the different symbols meant in patterns. Mostly I learned by looking at the symbol charts and the sample stitch pictures. Boy, oh boy, did I frog a lot. I would rip out projects so many times my yarn would completely lose its elasticity. And we are talking about the yarn quality of the '90s.....not amazing. 
                                                 
                                        
So, what is the big deal about reading a pattern? Think about it like this: what if the Internet stopped working tomorrow? What if you no longer had access to all those videos to walk you step by step through every pattern? What if, and this is far-fetched, the Zombie Apocalypse happened and you were left to be the mitten, hat, and scarf maker for your Zombie Apocalypse survival gang, and all you had were the patterns you had printed off the computer way back when? Will you be able to make the needed items? 


I know my questions may seem silly, so let's look at it logically. Written patterns are a treasure. They are something that can be handed down from one generation of crafters to the next. I have many that my Grandmother has passed down to me. Our society has become so technology-driven that many of the "arts" of old are beginning to pass away; like reading a crochet or knitting pattern. I find it ridiculous that even manuals aren't included with products anymore. You have to go online and download it. What happens if you don't have access to the Internet? I had a friend that recently lost thousands of saved patterns because her iPad crashed. How do you even remember what you had saved so you can go back and get it again? It seems strange, but I know people who do not have the Internet and do not have an email address. That's a completely foreign concept to many of us, but they are still alive and functioning. Probably better than a lot of us that are completely consumed by our technology tether. You would be doing yourself a favor to expand your brain capacity (I'm not saying you aren't already smart), challenge yourself, and learn how to read patterns. The Craft Yarn Council put out an interesting article on the health benefits of knitting. Knitting and crochet, alike, challenge the brain. They make you focus, do the math, and use your creativity (I hate math, but I love crochet math). In my humble opinion, it's not JUST about making something. It's about WORKING the pattern. Looking at a piece of paper and figuring out what is being said....like a puzzle. I love puzzles. Besides, you can call yourself bilingual. Crochet really is it's own language. Haha! It's not just a bunch of symbols and abbreviations. It's your ticket to turning a ball of string into something genius!


If you use YouTube exclusively, do you ever feel bad that a pattern you really want to make doesn't have a video? I don't want you to feel bad. I want you to be able to pick up any pattern you see and make it. I know that sometimes it's about being a visual learner. Picture tutorials have become almost commonplace in many written patterns anymore. I know that the patterns that I have written in the last year or two have pictures included to help you make the pattern. We don't always have people surrounding us to show us all the stitches, so I understand the need to use YouTube as a tool to teach you something new. I use it to learn new knit stitches when I just can't figure out what the instructions are saying. The one thing I want to encourage all of us about is not to allow ourselves to become indifferent, or passive, about our craft. Let's not become so reliant upon technology that we actually cripple our creativity. Liberate yourself! Become independent! Learn to read written patterns, it can only make you better! Use YouTube as the stepping stone it is, not as a vice or crutch. ;)


Here are a few resources from the Craft Yarn Council to get you started down your pattern reading journey: 

Here is a very well written blog post on How to Read a Written Pattern from Stephie's Corner: crochet 101

Happy Crocheting!
Biz 


Florida's Emerald Coast- Road Trip CAL 2025

WELCOME to  FLORIDA'S  EMERALD COAST  on this awesome Road Trip Around the World!! all pictures credit to: getwallpapers.com We're S...