Hello, my fantasy crochet friends! Today, I'm thrilled to re-introduce to you a quirky project that's sure to spark joy in your crafting journey – the Whimsical Castle Toy Bag! 🏰✨
This is an OG pattern of mine from 2006 that has gotten a recent update and rewrite. It was one of the first patterns that I wrote out, so it was definitely lacking in the style department. But, I recently reconfigured it so that it has more stability and integrity and it now stands on its own. Plus, I redesigned the roof so it helps in the stability of the castle instead of being too wonky to be any good. Yay! I'm really excited about the fact that this little pattern has had the chance to have some new life breathed into it. My testers were very happy with the changes, so if you ever made this pattern when it was in its original state, I hope you are happy with the changes too.
Regardless of your level of crochet expertise, this charming little castle-inspired bag, complete with a rippled roof and a tie closure that playfully peeks through the window, is going to be a fun and enchanting project. It works up quickly and uses very basic stitches.
What makes this project truly magical is its versatility. While the pattern is designed for a compact size, perfect for storing small treasures or even as a cozy home for tiny characters, you can customize it to your heart's content. Want a grander castle fit for a fairy tale kingdom? Simply scale up the yarn weight, and voila! Your imagination is the only limit.
Recommendations:
Now, let's talk materials. While you can use any yarn weight for this project, I highly recommend worsted weight or bigger. Why, you ask? Well, not only does it give your castle bag a sturdy structure, but it also provides ample space for creating those adorable miniature characters to inhabit its whimsical walls. Think of it as a blank canvas just waiting for your creative touch!
With just 2 ounces of yarn needed, this project is perfect for stash-busting! Say goodbye to your leftover yarn scraps gathering dust in your closet and hello to a charming castle toy bag that's as practical as it is whimsical.
This project isn't just about crocheting; it's about spreading joy and wonder to those around you. Imagine gifting this charming castle toy bag at a baby shower for parents who adore fantasy-based toys. It's a thoughtful gesture that's sure to earn you some major brownie points – and perhaps a few requests for your next crochet masterpiece!
Now, here's the best part – the pattern for the Whimsical Castle Toy Bag is available for free on my blog- just scroll down! You can dive into this enchanting project without another thought. But, for those who prefer a convenient PDF format, I also offer a PDF upgrade option. You can purchase the pattern on Etsy, Ravelry, or my Website, just click a picture below:
If you're ready to get crocheting, grab your crochet hook, raid your yarn stash, and let's embark on a magical journey together. Whether you're crafting for yourself or spreading joy to others, the Whimsical Castle Toy Bag is going to bring a touch of enchantment to your crochet adventures.
Whimsical Castle Toy Bag Pattern
Materials:
Yarn:
2 oz WW yarn (Sample
used Hobby Lobby I Love This Yarn, 100% acrylic, 7oz/199g, 355yd/325m)
Small amount of green yarn for the vine
You will use the same approximate
amount of yarn if you use Bulky, 8ply, or Worsted Weight.
Tester's information:
Alisha- Used 2 oz worsted weight with a 4mm hook. Her finished size was 6" wide x 7" high
Mik- Used 8 ply weight with a 4.5mm hook. Her finished size was 6" wide x 7 " high
Tiffiny- Used #5 bulky weight with a 4.5mm hook. Her finished size was 6.5" wide x 7.5" high
Notions:
#7/4.5mm hook
Yarn needle
Stitch marker
Skill Level: beginner - advanced beginner
Finished Size:
Bottom- 4-1/2” W x 3” H
Top- 6” W x 2-3/4” H
Total Size- approximately 6” W
x 6” H
Gauge: 16sc x 17rows = 4” x 4”
Abbreviations- US
Terminology
BPsc- back post single
crochet
ch- chain
dc- double crochet
MR- magic ring
Rd- round
rev sc- reverse single crochet (Crab Stitch)
sc- single crochet
sk- skip
sl st- slip stitch
st- stitch
NOTES:
1
Pattern is worked in the round
unless otherwise noted.
2
Do not join rounds unless otherwise
noted.
3
Chain 2 at the beginning of a
round is not a stitch.
Pattern:
Bottom:
Rd 1- MR, 6 sc in ring. (6 sc)
Rd 2- 2 sc in each sc.(12 sc)
Rd 3- (sc in 1 sc, 2sc in next) around. (18 sc)
Rd 4- (sc in 2 sc, 2sc in next) around. (24 sc)
Rd 5- (sc in 3 sc, 2sc in next) around. (30 sc)
Rd 6- (sc in 4 sc, 2sc in next) around. (36 sc)
Rd 7- (sc in 5 sc, 2sc in next) around. (42 sc)
Rd 8- (sc in 6 sc, 2sc in next) around. (48 sc)
Rd 9- (sc in 7 sc, 2sc in next) around. (54 sc)
join with sl st to first sc.
Sides: (join all rounds w/sl st unless noted)
Rd 1- ch1, BPsc around each sc. (54 BPsc)
Rd 2- ch1, sc in join and each BPsc around.
(54 sc)
Rd 3- Repeat row 1
Rd 4- Repeat row 2
Rd 5- Repeat row 1
Rd 6- ch2, dc in join and each BPsc. (54 dc)
Rd 7- ch1, sc in join and each dc leaving last 4 dc unworked. do not join.
(50 sc)
Rd 8- ch1, turn, sc in each sc. (50 sc)
Rd 9- ch1, turn, sc in each sc, ch4, sk open
st and join with first sc. (50 sc, 4 ch)
Rd 10- ch1, sc in join and each sc, 4sc around ch4, join with first sc. (54 sc)
Rd 11- Rev sc around. Finish off and weave in ends.
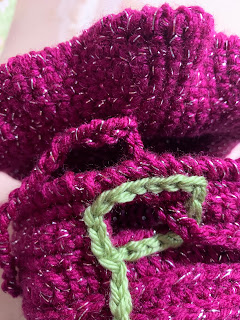
Vine trim: With green. Sl st & ch a trellis up the join
openings and around the window on the side of the castle base. (Pictures below)
Top:
Rd 1- MR, 5sc in ring.
Rds 2 & 3- sc in each s. (5 sc)
**After Rd 3, pop the right side of your work out of the cone created by the
last 3 rounds and continue with Rd 4.
Rd 4- 2 sc in each sc. (10 sc)
Rd 5- sc in each sc. (10 sc)
Rd 6- (sc in 1sc, 2sc in next) around. (15 sc)
Rd 7- sc in each sc. (15 sc)
Rd 8- 2 sc in each sc. (30 sc)
Rd 9- sc in each sc. (30 sc)
Rd 10- (sc in 4sc, 2sc in next) around. (36 sc)
Rd 11- (sc in 8sc, 2sc in next) around. (40 sc)
Rds 12 & 13 - sc in each sc. (40 sc)
Rd 14- (sc in 7sc, 2sc in next) around. (45 sc)
Rd 15- (sc in 8sc, 2sc in next) around. (50 sc)
Rd 16- (sc in 4sc, 2sc in next) around. (60 sc)
Rd 17- (sc in 5sc, 2sc in next) around. (70 sc)
Rd 18- (sc in 4sc, 2sc in next) around. (84 sc)
Rd 19- (sc in 5sc, 2sc in next) around. (98 sc)
Rd 20- Join with sl st to 1st sc. Reverse sc. Finish off, weave in ends.
YOU WANT A SLIGHTLY RIPPLED LOOK TO THE TOP WHEN DONE.
Tie for closure: do in roof color or green
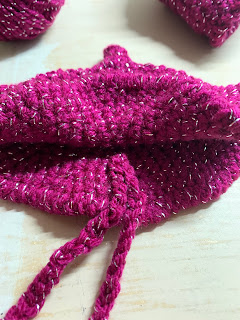
ch30, choose a side of your roof to be the “front”, at
about row 15, on the underside of the roof- attach with a sl st around a post
of sc and Ch 30, cut off. secure ends. (pictures below)
ch 30 and finish off.
Assembling your Castle (attaching
the top to the bottom):
1.
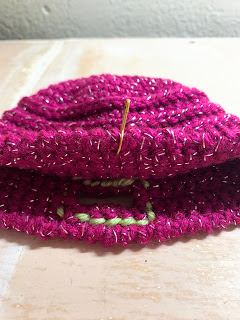
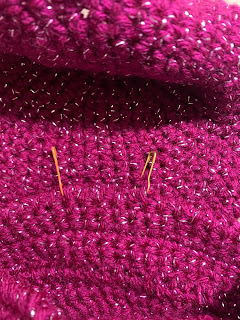
Fold your roof in half with
the tie centered- locate the opposite side of the roof and mark it with a
stitch marker. (pictures 1-3 below)
2. On the bottom piece, locate
the opposite side from the window and mark it with a stitch marker. (See
picture 4 below)
3.
Attach the marked side of
the roof to the marked side of bottom piece with a whipstitch or other sewing
technique. Use your stitch markers to help you hold your pieces together by
marking the first and last stitches you want to attach through. You only want
to attach through about 6 stitches of the top and bottom. This will act as your
“hinge” to open and close the roof. (Pictures 5-8 below)


.png)


Do you have a general pattern for the little characters? :)
ReplyDeleteHere's a link to Melissa Mall's little characters:
ReplyDeletehttp://www.crochetme.com/Aug_Sept_2005/patt_finger_puppets.html
This is really really cute! Thanks for sharing it! :)
ReplyDeleteFantastic pattern made the whole set and it was loved by all :-D
ReplyDeletetotally LOVE your castle! wish i had some kiddies to make it for.
ReplyDeletethanks for sharing.
jd in st louis
http://crochet.craftgossip.com
I have just visited your blog, and I love it. Thank you for your generous free pattern, I am going to have a go today. I have two (home ed)daughters, and I know they'll love it. Peace and happiness your way :)
ReplyDeleteJust found your blog through Free Crochet Patters- I love all you ideas, especially the fairy tale castle and all the little characters that go along with it. Thanks a ton!
ReplyDeleteThis is going to be printed today. It is going to be a bird house! I crocheted a bird house last spring and a sparrow (I think it was) took up residence the same day I hung it up.
ReplyDeleteI made the barnyard gang for my grandson, and fantasy castle for his sister for Christmas...they were a great big hit! Thanks so much for sharing free patterns!
ReplyDeleteI made this for a charity auction and it raised $100!!
ReplyDeleteWoohoo Mary Ann!!! Way to go, You!!!
ReplyDelete