Tuesday, May 06, 2014

Irish Wave Baby Blanket

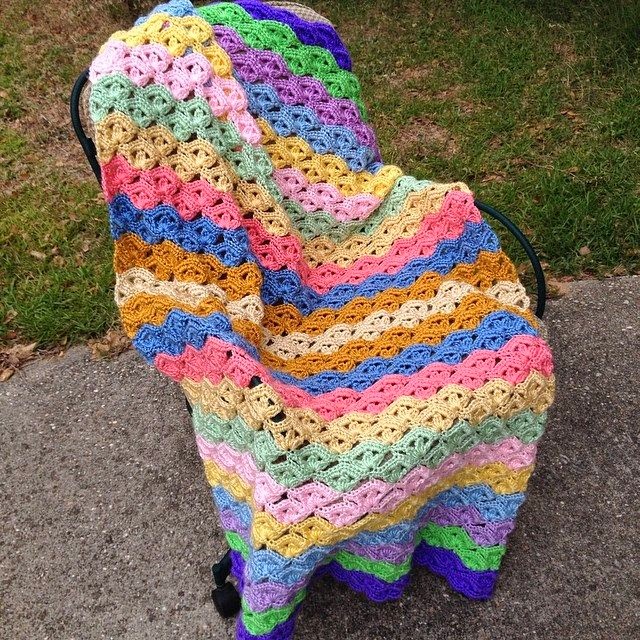
Irish Wave Baby Blanket Pattern

by Elizabeth Mareno


If you don't want to copy and paste the pattern or deal with the advertising,
it is available as a PDF download on ETSY, Ravelry, and my website!

This pattern includes instructions for both a scarf and a baby blanket.

NOTES: The baby blanket can easily become an adult blanket by simply continuing to add waves. Also, changing yarn weight and hook size will significantly change the way the afghan looks and what size you can achieve. If you want to add motifs to make it wider this is the math I would use: 1 motif = 14 chains. Each motif is approximately 3” wide. So decide how many more inches wide you would like your blanket (original is 32”) and add that many chains per motif to the original chain count. You may have to play with it a little.

It is a simple and lovely four row repeat that I hope you’ll try! 

Materials:
Light worsted like Yarn Bee Soft Secret  or a DK weight 40.25 total ounces of yarn needed for a baby blanket with 23 four-row repeats. 
Each color stripe** used approximately 1.75 ounces each.
1,450 yards for total blanket. 
Approximately 65 yards for 2 complete color stripes**.
**color stripes are a complete 4 row repeat

G hook Large Eye needle for weaving ends.

NOTES: The ch 2’s and ch 5’s at the beginning of the rows count as hdc and trc, respectively. However, chain 1 does not count as a sc.
Gauge is not necessary for this project.
Finished size for the baby blanket is approximately 46” long x 32” wide. The “soft” yarns have a great deal of stretch to them.
Scarf width is approximately 7”.

Specialty Stitches:
2trc cluster: *yo twice, insert hook into st indicated, yo, pull up loop, (yo, pull through 2 loops) twice, * leave the last loop on the hook. Repeat * to * once in the same space. Yo, pull through three loops left on the hook.
3trc cluster: *yo twice, insert hook into st indicated, yo, pull up loop, (yo, pull through 2 loops) twice, * leave the last loop on the hook. Repeat * to * twice in the same space. Yo, pull loop through four remaining loops on hook.
Sm sp = “same space”
Turning chain= the chain you made before you turned your work.

Scarf:
Base Row: ch31, hdc in 4th ch from hook and each across (29)

Row 1: ch5, trc in sm sp, ch3, 3trc cluster in sm sp, ch2, sk 6, sc in next, ch2, sk 6, (3trc cluster, ch3, 3trc cluster, ch3, 3trc cluster) in next st, ch2, sk6, sc , ch2, sk 6, 3trc cluster in turning ch, ch3, 2trc in sm sp.

Row 2: ch2 (cts as hdc), hdc in sm sp, 3hdc across ch3, * hdc in next cluster, 1 hdc in next ch2 sp, hdc in sc, 1hdc in ch2 sp *, hdc in cluster, 3hdc in ch3 sp, 3hdc in cluster, 3hdc in ch3, Repeat * to * once, hdc in cluster, 3hdc in ch3, 2hdc in last trc, sk ch5.

Row 3: ch1, sc in sm sp, ch2, sk 6 hdc, (3trc cluster, ch3, 3trc cluster, ch3, 3trc cluster) in next hdc, ch2, sk 6, sc in next, ch2, sk 6, Repeat ( ) once, ch2, sk 6, sc in turning ch.

Row 4: ch2, hdc in ch2 sp & next cluster, *3hdc in ch3 sp, 3hdc in next cluster, 3hdc in ch3 sp, hdc in next cluster, hdc in ch2, hdc in sc, *hdc in ch2, Repeat * to * once.

Continue working Rows 1-4 for as long as you would like the scarf to be. The typical scarf length is anywhere between 50-60” long depending on how much you want to be able to wrap the scarf around you.

Picture below is a step-by-step picture tutorial for working rows 1-4 if you need help. 


Baby Afghan:
Base Row: ch171, hdc in 4th ch from hook and each across (169)

Row 1: ch5, 2trc in sm sp, ch3, 3trc cluster in sm sp, ch2, sk6, sc in next, *ch2, sk 6, (3trc cluster, ch3, 3trc cluster, ch3, 3trc cluster) in next st, ch2, sk6, sc*. Repeat * to * ten times more (11 full clusters), ch 2, sk 6, 3trc cluster in turning ch, ch3, 2trc in sm sp.

Row 2: ch2 (cts as hdc) hdc in sm sp, 3hdc across ch3 (picture 1), *hdc in next cluster, 1 hdc in next ch2sp, hdc in sc, 1hdc in ch2sp (picture 2), hdc in cluster, 3hdc in ch3sp, 3hdc in cluster, 3hdc in ch3 (picture 3)*. Repeat * to * ten more times. Hdc in next cluster, hdc in ch2sp, hdc in sc, hdc in ch2sp, hdc in cluster, 3hdc in ch3sp, 2hdc in last trc, sk ch5.

Row 3: ch1, sc in sm sp, ch2, sk 6 hdc, *(3trc cluster, ch3, 3trc cluster, ch3, 3trc cluster) in next hdc, ch2, sk 6, sc in next, ch2, sk 6*. Repeat * to * ten more times. Sc in ch2 from row below (otherwise known as turning chain).

Row 4: ch2, *hdc in ch2sp, hdc in cluster, 3hdc in ch3sp, 3hdc in next cluster, 3hdc in ch3sp, hdc in next cluster, hdc in ch2sp, hdc in sc*. Repeat from * to * 11 more times

Repeat Rows 1-4 until you achieve the length you want for your afghan.


One of the many beautiful things about this particular pattern is that you don't have to put a border on it when you're done, unless you want to. I chose not to, because the sides sort of finish themselves off. Plus, there is so much movement going on inside the bulk of the blanket, I didn't want anything to take away from it's beauty, or make it an eyesore.  I hope you enjoy this pattern!

© Bizzy Crochet and Design 2014


Thursday, May 01, 2014

Chutes and Ladders Infinity Scarf Pattern

Chutes and Ladders Infinity Scarf Pattern

by Elizabeth Mareno


Bulky yarn and a big hook give you an adorable, snugly winter accessory in an afternoon. Perfect for gifts, or sprucing up your wardrobe. It incorporates easy crochet stitches into a fun and simple scarf that lacks nothing in warmth and style! Dress it up with your favorite buttons, flowers or pins!


You can purchase an ad-free PDF on ETSY or my website


6 oz Bulky yarn 
Multicolored- “Rainbow Classic” in the Multi-Citrus colorway
Gray: Yarn Bee- “Tender Touch”- Rain colorway
J Hook 
Large Eye needle for assembly 

Infinity scarf: 
Row1- Ch26, sc in 2nd ch, (ch1, sk ch, sc in next ch) across. 
Row2- ch1, turn, sc in first sc and first ch1 space,(ch1, sk sc, sc in next ch1) across, sc in last sc. 
Row3- ch4 (cts as dc and ch1), turn, (dc in next ch1, ch1) repeat across, dc in last sc. 
Row4- ch1, turn, sc in dc and ch1 space, (ch1, sk dc, sc in next ch1) across, sc in dc. 
Row5- ch1, turn, sc in first sc, (ch1, sc in next ch1) repeat, ch1, sc in last sc. 
Row6- ch3, turn, dc in ch1, (ch1, dc in next ch1) across, dc in last sc. 
Row7- ch1, turn, sc in dc, (ch1, sc in next ch1) across, ch1, sc in last dc. 
Repeat Rows 2-7 
End with a dc row when it is about 5 feet long. 
Leave a long piece for sewing ends together. 

© Bizzy Crochet and Design 2014

African Flower Afghan

I wanted to show you my latest afghan accomplishment. I'm pretty proud of the way it turned out. I think my newly 16 year old niece will like it too. :)

I struggled trying to make another afghan with squares, but the motifs were flat and lifeless and I just couldn't do it. I really wanted to make a flower style afghan, and I kind of knew I wanted to do something like an African Flower motif. I didn't want a raised- poofy flower. I felt like that might be too much material, if you understand what I mean. She is also in that transition between little girl and woman, so I wanted something that could grow with her. 

It took me forever to find an African Flower motif pattern. I don't know why I was so "challenged". lol When I finally located an English version of an African Flower, it made almost no sense if I didn't have a picture sitting right there. So, I am going to share the simple pattern with you in laymen's terms. 


Easy pattern instructions: I used worsted weight (RHSS) yarn and a J hook.

R1: ch5, join to make a circle, ch3 (counts as a dc), dc in the circle, ch1, (2dc, ch1) in the circle 5 more times, sl st to first dc to join. (6 ch1 sp, 12 dc) cut color.

R2: join with next color in a ch1 sp, ch3, (dc, ch1, 2dc) in same ch1 sp, (2dc, ch1, 2dc) in each ch1 sp around skipping everything else in between them, join with a sl st to the first dc. (6 ch1 sp, 24 dc) do not cut color.

R3: sl st over to the next ch1 sp, ch3 (cts as dc), put 6 more dc in the same ch1 sp, put 7 dc in the remaining ch1 spaces skipping everything in between, join with sl st to first dc. (6 "petals) cut color.

R4: Using the first color, join with a sl st to the first dc of a petal, ch1, sc in join sp and next 6dc, in the space between petals make a long dc around the "bridges" created by the skips in rows 2 and 3, repeat this pattern around. (42 sc, 6 long dc) cut color.

R5: With a border color, join with a sl st to the center sc on a petal, ch3, 2dc in the same space, (dc in 7, 3 dc in next) repeat until you reach the last 7 stitches, dc in the last 7, join with a sl st to the first dc. cut color.

I usually leave a long end for whipstitching my pieces together. 

The next pictures just show my afghan progress until I finished. I chose not to make half motifs, but left the edges open. I did finish with a simple border. 


The blanket finished out at 50" long by almost 40" wide. I think, from start to finish, it took me a week and a day to finish it. 

The colors I used were Red Heart Super Saver in Dark Orchid, Medium Purple, Purple Tones, and Melonberry. The Melonberry is what made the whole thing pop. 


Friday, April 11, 2014

Paddle Wheel Dishcloth Pattern

Paddle Wheel Dishcloth

by Elizabeth Mareno


Materials:
1 oz Worsted Weight Cotton
H hook
Large Eye Needle for weaving ends

Pattern:
Row 1: ch4, join to make a circle. ch4 (cts as dc + ch1), (dc, ch1) 11 times, sl st to 3rd ch of ch4. (12 dc, 12 ch1)

Text Box: 3Row 2: (ch4, sk 2 ch1 sp and next dc, sl st in next dc) 6 times, sl st in first ch of row. (6 ch4 sp)

Row 3: ch2 (cts as hdc), working behind ch4’s from Row 2, [2hdc in ch1 sp, 1hdc in dc, 2hdc in ch1 sp, 1hdc in back bars of sl st from Row 2] around, sl st to first hdc. (36 hdc)

Row 4: ch1, fpdc around ch2 from Row 3, [ch2, sk 1 hdc, dc in next, ch1, sk 1 hdc, dc in next, ch2, sk 1 hdc, fpdc ar next hdc] around, sl st to 1st fpdc. (12 dc, 6fpdc)

Row 5: [ch4, sk ch2 sp and dc, sl st in next ch1 sp, ch4, sk dc and ch2 sp, sl st in fpdc] around. Sl st to 1st ch of Row 5. (12 ch4 spaces)

Note for Row 6- Be careful not to skip over the single double crochet stitches. They can sometimes get lost while your working the row. Make sure your row count is correct before moving on.

Row 6: ch2 (cts as hdc), working behind ch4’s from Row 5, [3hdc in ch2, hdc in dc, hdc in bars of sl st, hdc in dc, 3hdc in ch2, hdc in bars of sl st] around. Sl st to ch2. (60hdc)

Row 7: ch1, fpdc ar ch2 from Row 6, [ *ch2, sk 1 hdc, dc in next, (ch1, sk1, dc in next) 3x, ch2, sk 1 hdc,* fpdc around next hdc] 5x, repeat * to * once. Sl st to first fpdc to finish. (30 ch sp)

Row 8: [*ch4, sk ch2 and dc, sl st in next ch1 sp, ch4, sk 2 dc and ch1 sp, sl st in next ch1 sp, ch4, sk dc and ch2 sp,* sl st in fpdc] 5x , repeat * to * once, sl st to 1st ch of row 8. (18 ch4 spaces)

Row 9: ch2 (cts as hdc) , working behind ch4’s from Row 8,  [*(2hdc in ch sp, hdc in dc, hdc in bars of sl st, hdc in dc) twice, 2hdc in ch sp*, hdc in bars of sl st] 5x, repeat * to * once. Join with sl st to first ch2. (76 hdc)

Thursday, April 10, 2014

NEW FREE Pattern! Rastafari Slouch Hybrid Hat- Knit/Crochet Combo!

I came up with this hat close to Christmas and I am just now getting it put up for everyone. It uses both knit and crochet- so you will need to know how to do both to make this pattern. Otherwise, it's very simple and beginner friendly. 


The pattern is available on Ravelry!


Chutes & Ladders Infinity Scarf Pattern coming soon!!

Comparing Cottons

I looked up Knit Picks cotton yarn today because I got an email about something-something...cotton yarn...something-something. I know, specific right? 


But, they have a fantastic color selection, so I went to look. The first balls of cotton yarn I saw were the Comfy pictured above. They are only 50g for $2.99. That seemed somewhat expensive for me considering I can get super soft "I Love This Cotton" (approx 85g to 99g depending on the color)  from Hobby Lobby for $3.29/skein, pictured below. 


To my $ sensibilities it looked pretty no-win for the Knit Picks. However, I noticed they had a yarn called Dishie, picture below. 


From a distance, the shape of the ball gives the illusion that it is the same scratchy cotton as Sugar n Cream. However, upon closer inspection of the picture, you can see that it has the same silky texture that the "I Love This Cotton" has. It is also a much bigger skein of yarn than the Comfy at 100g, and very close in size, if not a tiny bit bigger than the ILTC. It costs $3.99...$.70 more a skein than Hobby Lobby's brand...but, the color palette is so bright (even thought there are only 28 colors between the solids and variegated's). I'm going to have to give some serious thought to purchasing some Knit Picks cotton. I have been slobbering over Knit Picks for about 7 years now, and the only thing I have gotten from them is my ball winder. (The one and only time my husband bought me a birthday present that was a complete surprise and something I really, really, really wanted.) Besides, I think I would really like to start custom dying some yarns for my own uses. I hate it when people have very specific color requests and you can't find anything like what they want without having to use two separate yarns together. 

If anyone has any experience with Knit Picks, I would love some advice!

Friday, April 04, 2014

Fuzzy Warmers: Knit Leg Warmers Pattern

Fuzzy Warmers: Knit Leg Warmers

by Elizabeth Mareno

They are as soft as a sweater with a comfortable stretch up to XL.
Rich, thick cables worked in bulky yarn make these leg warmers the perfect cold-weather accessory!

You can purchase an ad-free version on ETSY or my website.


Materials:
6.5 oz Bulky yarn (more on the mohair side) (Yarn used Yarn Bee “Tender Touch” *)
Size 10 dpns
Cable needle
(if needed- I just use an extra dpn)
Large eye needle for weaving ends
Gauge: 10stitches x 10row of ribbing = 4”x4”
I used a long-tail cast on. Use any CO that has stretch.


Pattern: 
CO 40. Disperse on 3 needles.
Row 1-14: k2, p2 ribbing
Row 15: k, increasing 2 stitches evenly (42)

Row 16: k, p, (k4, p, k, p) repeat to last 5, k4, p.
Row 17: Repeat row 16
Row 18: k, p, (c4f, p, k, p, c4b, p, k, p) repeat to last 12, c4f, p, k, p, c4b, p.
Repeat rows 16-18 until you have 18 cable twists. Do rows 16 & 17 once more.
Repeat row 15 once, decreasing 2 stitches evenly (40)
Finish with 14 rows k2, p2 ribbing. Bind off in ribbing.
Work a four-stitch front cable when you come to the direction C4F in a pattern:
1)Slip the next 2 stitches on the left-hand needle to the cable needle and hold the cable needle to the front of the work.  2) Knit 2 stitches from the left-hand needle. 3) Knit 2 stitches from the cable needle.
Work a four-stitch back cable when you come to the direction C4B in a pattern:
1)Slip the next 2 stitches on the left-hand needle to the cable needle and hold the cable needle to the back of the work. 2) Knit 2 stitches from the left-hand needle. 3)Knit 2 stitches from the cable needle.
(Instructions from http://www.dummies.com/how-to/content/how-to-knit-a-fourstitch-cable.html)
© Bizzy Crochet and Design 2014
*Links marked with asterisks are affiliate links. If you use one of my links to make a purchase it won't cost you any more, but the company will give me a small bit of money back which helps me pay for the free content on my blog. Thank you for your support!


Thursday, April 03, 2014

Works in Progress and Completed Projects

Today's post is all about my Works in Progress and a couple of completed projects. 

The Yellow Blanket is Done...and should actually be delivered in Minnesota today! 
Unless FedEx lied. The yellow blanket is for the youngest of my brother's kids. 


These next two afghans are next in the series I am making for my nieces and nephews. The ripple afghan pattern comes from the Crochet Club. It's called the Wavy Ripple


I am making this one in Orange, Pink, and Neon multi for my brother's second youngest child, Lizzie (my name's sake).  It is very bright and for some reason every picture I see of it online looks so bright it's almost fuzzy. I promise it is easier on the eyes in person. I am very close to finishing this one, but I needed a little boredom buster project, so I started on my nephew's blanket. 


I am winging it on Sam's blanket. He's 14 and I just wasn't sure of what he liked other than the color green and guitars...and drums. I wanted his blanket to be manly, but still fun. And I wanted it to have a "graphic" feel to it. I am also aiming for each child's blanket to be completely original and nothing like any of the blankets their siblings receive. Everyone assures me he's going to love it. To me, it resembles a turtle's shell. However, it could also have a bit of a drum set feel to it, too. This picture shows Phase One. I think Phase Two might change the look up quite a bit, and maybe it will lose some of it's turtleness. The hexagons are quite large at 10" from flat side to flat side. I'm not even sure what they are point to point. I'll write up and share the pattern when I finish it. 


Some other projects that I have completed are two sets of Minnie Mouse newborn photo props. Turns out I didn't really get any decent pictures of them completed. Here you see the full set, but the little Mary Jane shoes don't have their buttons yet. I purchased this set from Stephyscrochet on Etsy. I LOVE this pattern. She did a great job with it ( I especially love the shoe pattern!). There are lots of pictures to help you assemble things properly, and her instructions are complete. Unfortunately, you cannot say that about all indie designers, but kudos to you Stephany for putting out a great pattern! If you all have known me for any length of time, you know I don't like purchasing patterns if I can help it. This set is worth it, so give her a visit! 

Ok, y'all...that's my last two weeks in a nutshell. Tah for now! 

Wednesday, February 05, 2014

How to Custom Size a Crocheted Hat!

How to Custom Size a Crocheted Hat!!


Figuring out how to make a hat to a specific circumference and length is not as hard as one would think. This formula works best for a closer fitting hat (think beanie or ski, not tam or slouchy). I am going to explain this in “beginner’s” terms. When I tried to learn how to do this, every “lesson” I read assumed that you understood math. I won’t assume that of you, because I do not understand math. So, here we go:

1) Take a flexible tape measure or a piece of string and wrap it around your head at the widest part, which is usually your forehead area. If you over lap your pieces, make sure you pinch or otherwise mark where you intersect your pieces. This isn’t terribly scientific but remember that the more “finger” you get behind your measuring piece, the bigger your measurement will be.

2) If you are using a flexible tape measure, look at your number. If you are using a piece of string, measure your piece of string at the intersect. This is your CIRCUMFERENCE.

3) Using a calculator, divide your circumference by 3.1415927 (PI). This will give you your ACTUAL DIAMETER. (Example: my head circumference is 23”/ 3.1415927= 7.32112727. Obviously, that number is too big to be workable, so we round to the nearest quarter number. I would round mine to a 7.25”.)

4) Here it gets a little funky. You will take your ACTUAL DIAMETER number and minus an inch off. We will call this our WORKING DIAMETER. So, my new WORKING DIAMETER will be 6.25”.

Why do we do this? I can’t give you a scientific reason, but I can give you a crocheter’s reason. Having made a few hats using the actual diameter, I discovered they weren’t so great as a hat. But, if I flipped it over and threw a handle on it they made a really nice handbag. Use my mistakes as a learning tool and turn your ACTUAL DIAMETER into a WORKING DIAMETER. 

5) Ok, now, in your increase rounds is where you will become an obsessive measure(er). I, actually, measure after each round until I get to know a pattern well. Work increase rounds until you reach your WORKING DIAMETER. After that, no more increases should be needed.


6) After you have reached your WORKING DIAMETER in your increase rounds, you can then start working the “body” of the hat. These are just round after round of your chosen stitch that will be worked until you reach the desired length. Take into account any trims rows you will want to put on the bottom of your hat when you are deciding on a finish length. 

I use Crochet Geek's Hat Size Chart for every single hat I make. I printed it off and I keep it in my crochet journal as a guide for all my hats. I wish my head were a computer and could just remember all those numbers, but it isn't and can't, so her chart is super handy!!

Sunday, January 26, 2014

Little Owl Crochet Applique

Little Owl Applique

by Elizabeth Mareno


Materials: worsted weight cotton-2 colors, small bits each. (I love this cotton was used)
Worsted or baby weight white, tiny bit
Worsted brown for beak
G hook
F hook
Lg eye needle

Owl:
With color #1 and G hook, ch 4
-Join to make a circle, ch2
(Chain 2 does not count as hdc)
-Put 12 hdc's in center of circle.(12)
-Before finishing the last hdc, chg color to 2nd color, then sl st to first hdc to join. 
- with new color, ch2 (not hdc), 2hdc in each hdc around (24)
- do not chg color, join with first hdc, ch2
EARS- hdc in sm sp as join & ch2,dc in the next st, ch2 and sl st in the second ch, dc in the sm sp as last dc, hdc in the next stitch, sc in the next, sl st in the next. Now just reverse that for the second 'ear'. Sc, hdc, dc-ch2-sl st-dc, hdc, then ch2 and sl st in sm sp as last hdc. 


Basic owl is done. 

EYES- with white and F hook, ch 2, put 6sc in 2nd ch from hook and finish off. See to face. Embroider small brown beak under the eyes. 

© Bizzy Crochet and Design 2014


Sunday, December 01, 2013

Converse Slippers

The original pattern was written in Finnish. And Handimania posted a picture tutorial and some instructions on their website. (Update 2017: It looks like they have done a Google translate from the original Finnish since I originally translated this.) It took me most of a day, but I got it figured out.

I wrote the instructions down so that I could make them again and I'm sharing with you. 


Materials:
About 4 oz main color- WW yarn
About an ounce white- WW yarn
G hook
Large eye needle for weaving ends

With white-
Row 1- Ch 3, join to make a circle, ch2, 12dc in circle. Join with sl at to 1st dc. 
Row 2- ch2, 2dc in each dc around (24) join
Row 3- ch2, (1dc in 1dc, 2dc in next) around. Join (36)
Row 4- ch2, dc in each dc. (36) cut white, join with main color. 
Row 5-8- ch2, dc in each dc, join (36)

Tongue:
Row 9- ch3 (cts as dc), dc in 13 dc. Leave remaining unworked. 
Row 10-20- ch3, dc in each dc. Finish off. Weave end. 

Shoe: 
Row 9- rejoin with last dc of tongue with a ch3, dc across to the other side, dc in am sp as ch 3 from tongue. (24)
Row 10-12- ch3 (cts as dc), dc in sm sp (increase), dc in each across, 2dc in last dc (increase). 
Row 13- ch3, make increase, dc in 13dc, 2dc in next, dc in 14dc, increase in last dc. 
Row 14- ch3, dc in each
Row 15-17- repeat rows 10-12.
Row 18- ch3, increase, (dc in 9dc, 2dc in next) 3 times, dc in 7dc, increase in last. 

This is where you can customize the length. Try it on if you can. 22 rows gives you an 11-1/4" foot. 
Row 19-22- ch3, dc in each dc. 
Cut leaving a long end. Whip stitch your slipper end together. 

Shoe edging:
Join with slip stitch in the base of the tongue where you join for the shoe- ch1, 2sc in each row end around, sl st to join join space on opposite side. 

Ch1, turn, skip sl st, sc in each sc, join with sl st in sm sp as original join. Cut, weave in ends. 

Star circle:
Row 1- Ch 3, 12dc in 3rd ch from hook, join
Row 2- ch3, 2dc in each. (24)
Row 3- ch1, (sc in 1dc, 2sc in next) around. Join. (36)

Embroider with black. 

Shoelace:
With white
Ch 151, sc in 2nd ch from hook and each. 

Weave in and out like shoelaces in the big holes left on the side where you put sc in row ends. 


Mandala Market Bag

  Mandala Market Bag Crochet Patt ern If you’ve been on the hunt for the perfect crochet market bag, look no further—the Mandala Market Ba...